
So you ran over a nail and now you’re staring at your tire wondering if you can fix this yourself. Good news: you probably can. Tire plugs are rubber strips that seal punctures in the tread area, and they’ve saved me from calling a tow truck more than once. A basic plug kit costs around fifteen dollars and takes maybe ten minutes to use once you get the hang of it.
Here’s the thing though. Plugs work great for certain punctures and fail completely on others. The difference comes down to where the hole is, how big it is, and what caused it in the first place. I’m going to save you the headache I went through by breaking down exactly when plugs work, when they don’t, and how to use them the right way.
This guide covers everything from what’s actually inside those plug kits to the specific situations where you should skip the DIY fix entirely. If you’re dealing with spare tires or wondering about your options after a flat, check out our complete guide on how long you can drive on a spare tire for the bigger picture.
A quick note before we dive in: Tire repair involves sharp tools and rubber cement that gives off fumes. Work somewhere with decent airflow, wear gloves when handling the cement, and make sure your car is on a stable, flat surface with the parking brake engaged. The techniques I share here are based on my own experience, and your specific situation may differ. If anything feels off or you’re not comfortable with any step, there’s no shame in having a shop handle it instead.
[IMAGE: Tire plug kit laid out showing all components – reamer, insertion tool, plugs, cement]
What Are Tire Plugs
Tire plugs are sticky rubber strips designed to fill puncture holes from the outside of your tire. They’re made from a tacky, unvulcanized rubber compound that bonds with the tire material when you shove them into the hole. The stickiness is the whole point (it’s what creates the seal).
Most plugs you’ll find are about four inches long and look like thick pieces of black licorice. When installed correctly, the plug expands slightly inside the puncture and the rubber compound vulcanizes over time, creating a semi-permanent seal. The Rubber Manufacturers Association considers a properly installed plug to be a temporary repair, though plenty of people drive on them for years without issues.
The basic concept hasn’t changed much since the 1950s. You ream out the hole, coat a plug in cement, jam it in with a special tool, and trim the excess. Simple in theory. The execution is where people mess up.
Types of Tire Plugs
Not all tire plugs are the same, and picking the wrong type for your situation is an easy mistake to make. There are three main varieties you’ll run into.
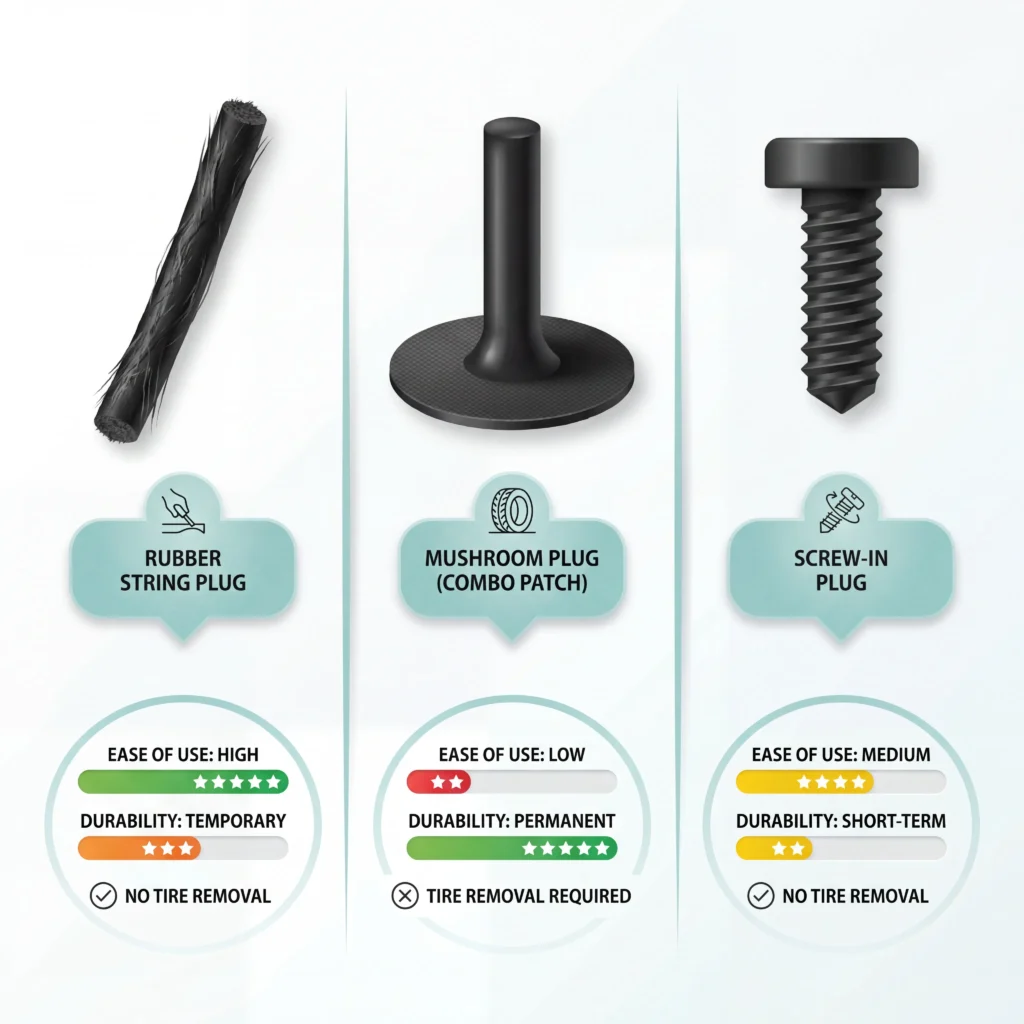
Rubber String Plugs
These are the most common type and what you’ll find in those fifteen dollar kits at auto parts stores. They look like thick rubber strings or cords coated in a tacky compound. You thread them through an insertion tool and push them into the puncture. They work well for small holes from nails and screws. Most are around 4 inches long and come in black or brown (more on that color question later).
Mushroom Plugs (Combination Plug-Patch)
These have a plug portion attached to a round patch. The plug seals the hole from the inside out while the patch covers the inner liner. This is what the tire industry actually recommends as a proper repair. The catch is you need to dismount the tire from the rim to install one, which means either having the right equipment or paying a shop.
Screw-In Plugs
These look like rubber screws and you literally twist them into the puncture. They’re marketed as easier to install than string plugs. I’ve seen mixed results with these. Some people swear by them for off-road situations where you need a quick fix. Others have had them work loose after a few hundred miles. They’re fine as a get-you-home solution but I wouldn’t trust them long-term.
For most roadside repairs, standard rubber string plugs do the job. If you want a repair that’ll last the life of the tire, a mushroom plug installed at a shop is the better call.
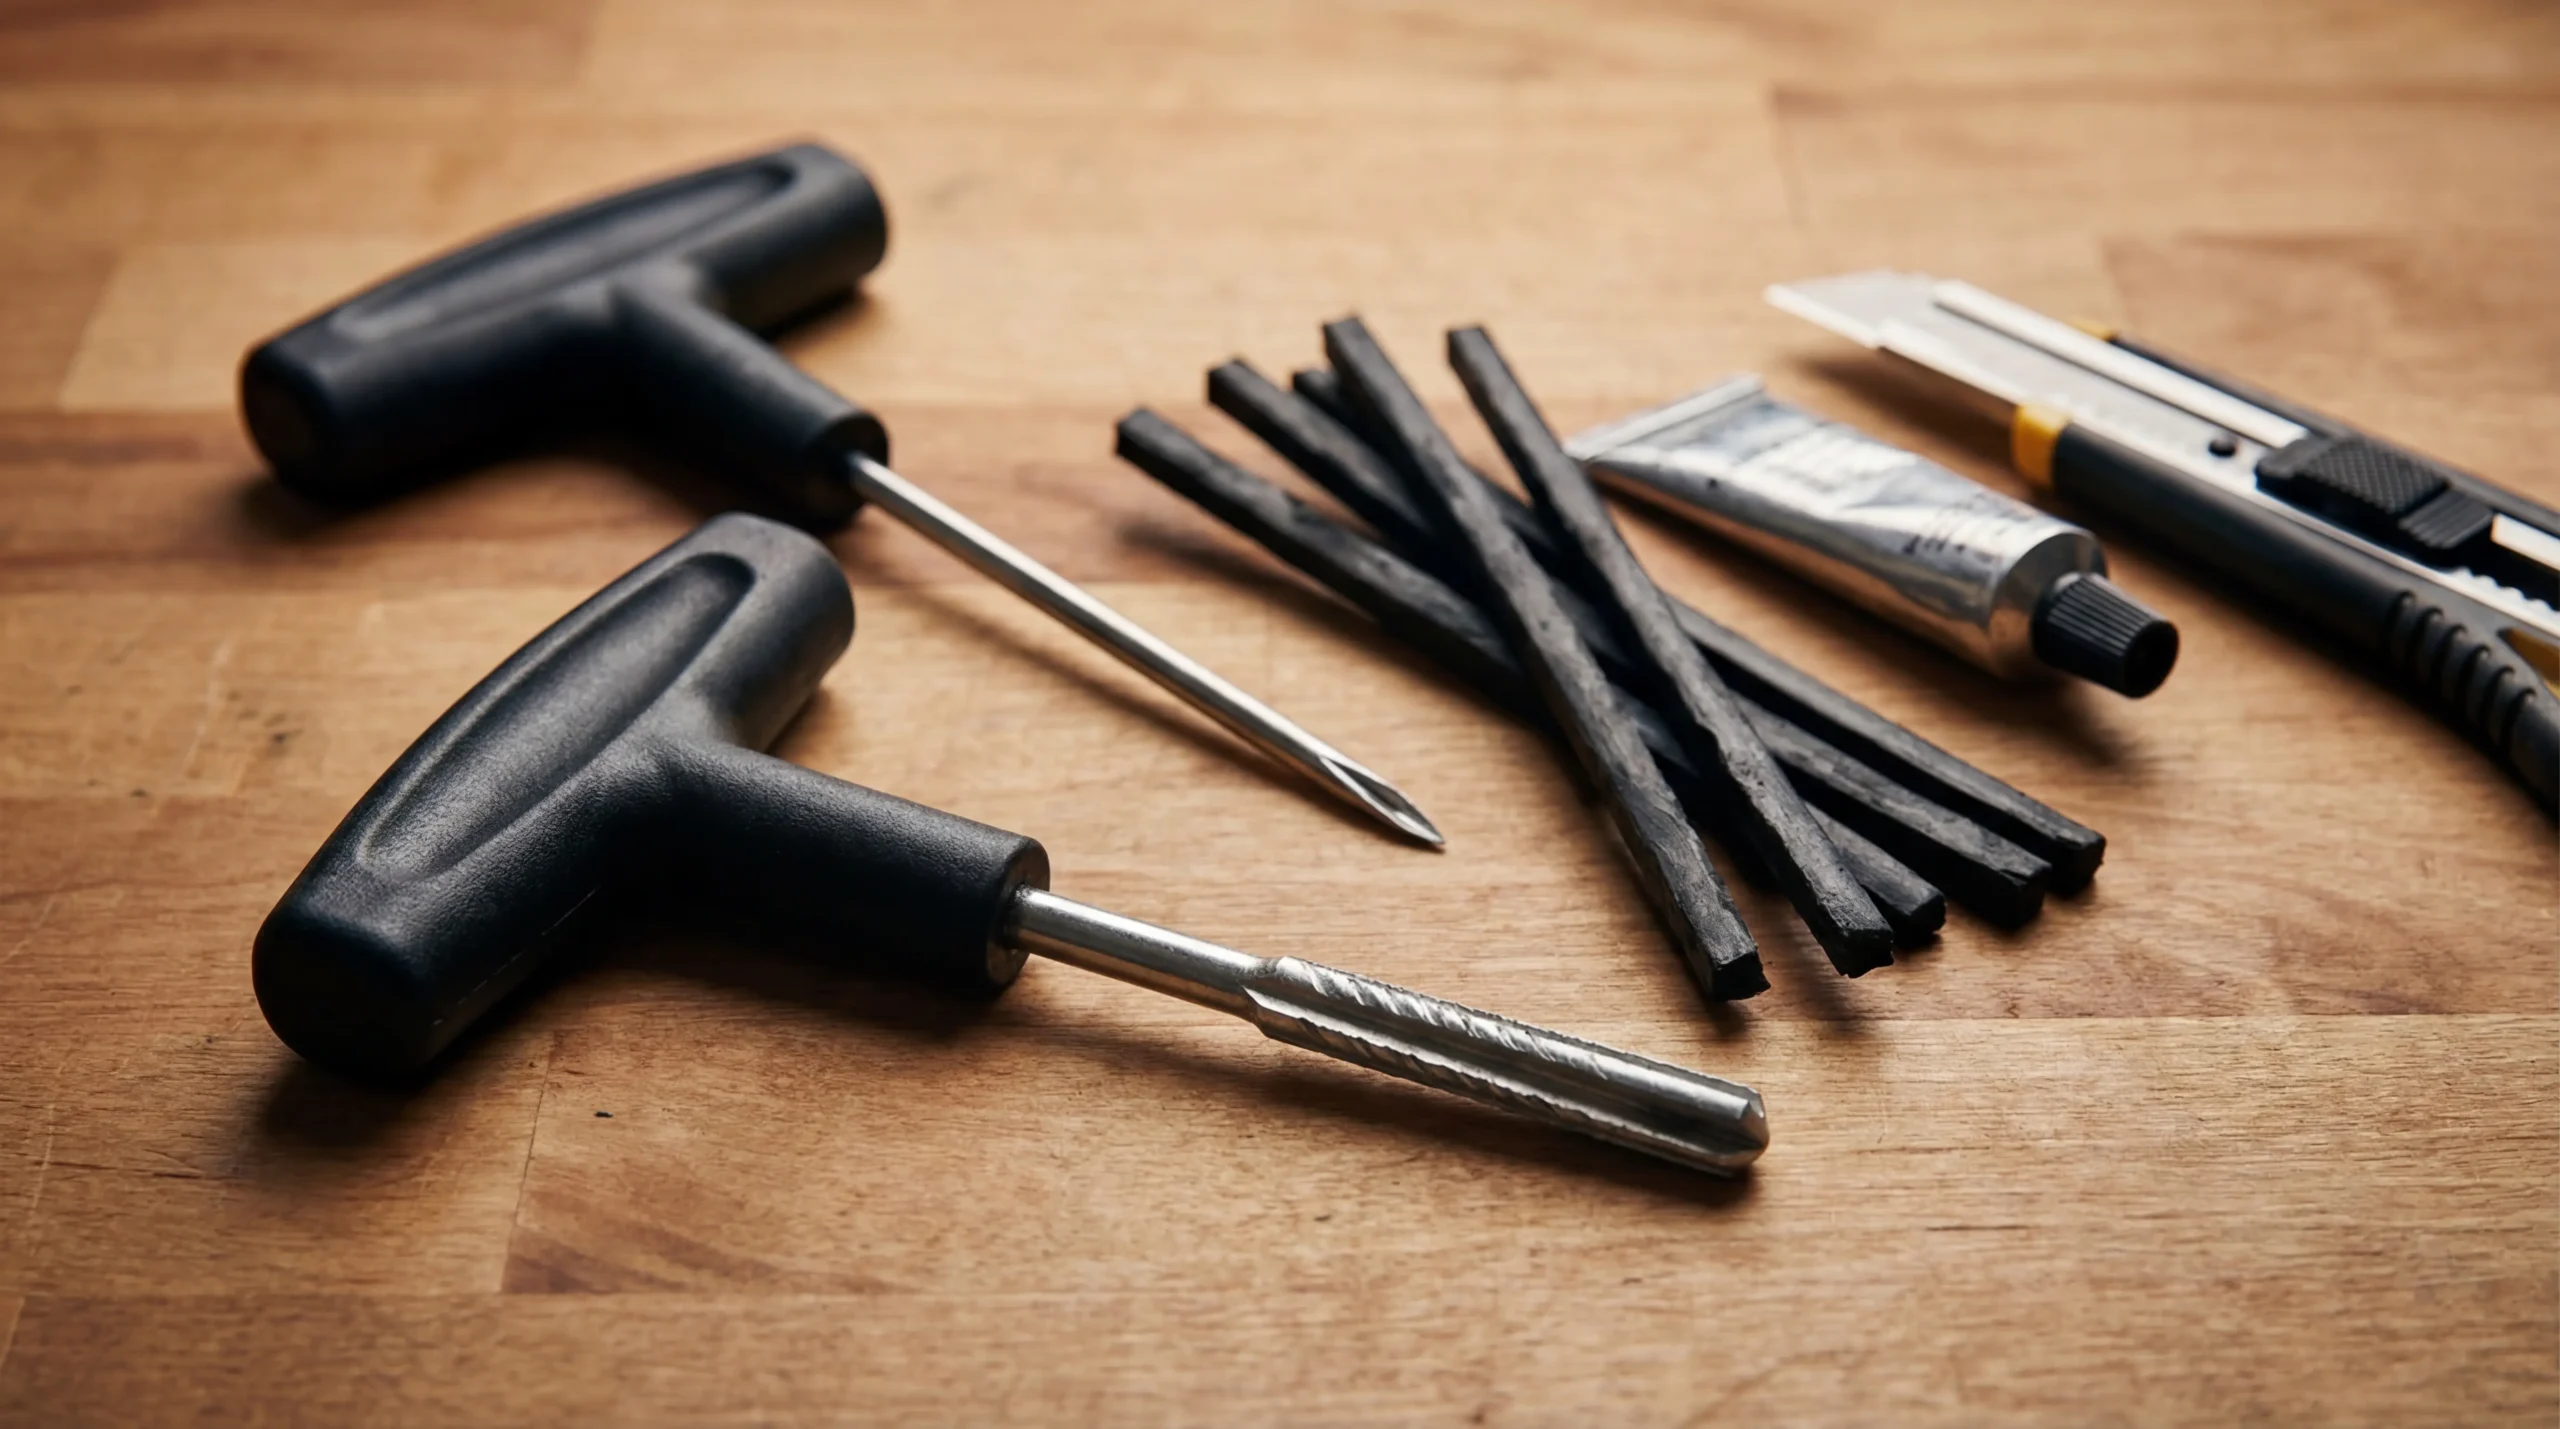
What’s in a Tire Plug Kit
A basic tire plug kit contains everything you need for a roadside puncture repair. Here’s what you’re working with when you crack one open.
The reamer tool (sometimes called a rasp) looks like a round file with a T-handle. Its job is to clean out the puncture hole and rough up the inside surface so the plug sticks. The file-like ridges remove debris and create texture for the vulcanizing cement to bond with. Fair warning: the reamer is sharp, so handle it carefully and keep it away from your fingers when you’re working.
The insertion tool has a split eye at the tip, sort of like a giant sewing needle. You thread the plug through this eye and use the tool to shove the plug into your tire. The split design lets you pull the tool back out while leaving the plug behind.
Rubber plugs come in packs of anywhere from five to fifty. Most kits include enough for several repairs. Check that they’re still tacky before you use them. If they’ve dried out and feel hard, they won’t seal properly.
Vulcanizing cement (or rubber cement) lubricates the plug during installation and helps create a chemical bond with the tire. The cement gives off fumes, so work somewhere with decent airflow and consider wearing gloves to keep it off your skin. Some newer plugs claim to work without cement. They might, but the cement definitely helps.
Some kits also include a knife or razor for trimming the excess plug material. If yours doesn’t, any sharp blade works. You want a clean cut flush with the tread surface.
Quick heads up: cheap kits often have flimsy tools that bend or break under pressure. Spending an extra five dollars on a mid-range kit saves frustration when you’re actually using it. The kit I keep in my glove box has lasted three years and cost under twenty dollars.
How to Use a Tire Plug Kit
I’ve plugged probably a dozen tires over the years, and the process gets easier every time. Here’s what actually works. Keep in mind that these steps work on most standard tires, but your results may vary depending on your specific kit and the nature of your puncture.
Step 1: Find the puncture. If you can’t see the nail or screw, spray soapy water on the tread and look for bubbles. Mark the spot with chalk or a marker once you find it.
Step 2: Remove whatever’s stuck in there. Grab it with pliers and pull straight out. Don’t wiggle it around more than necessary.
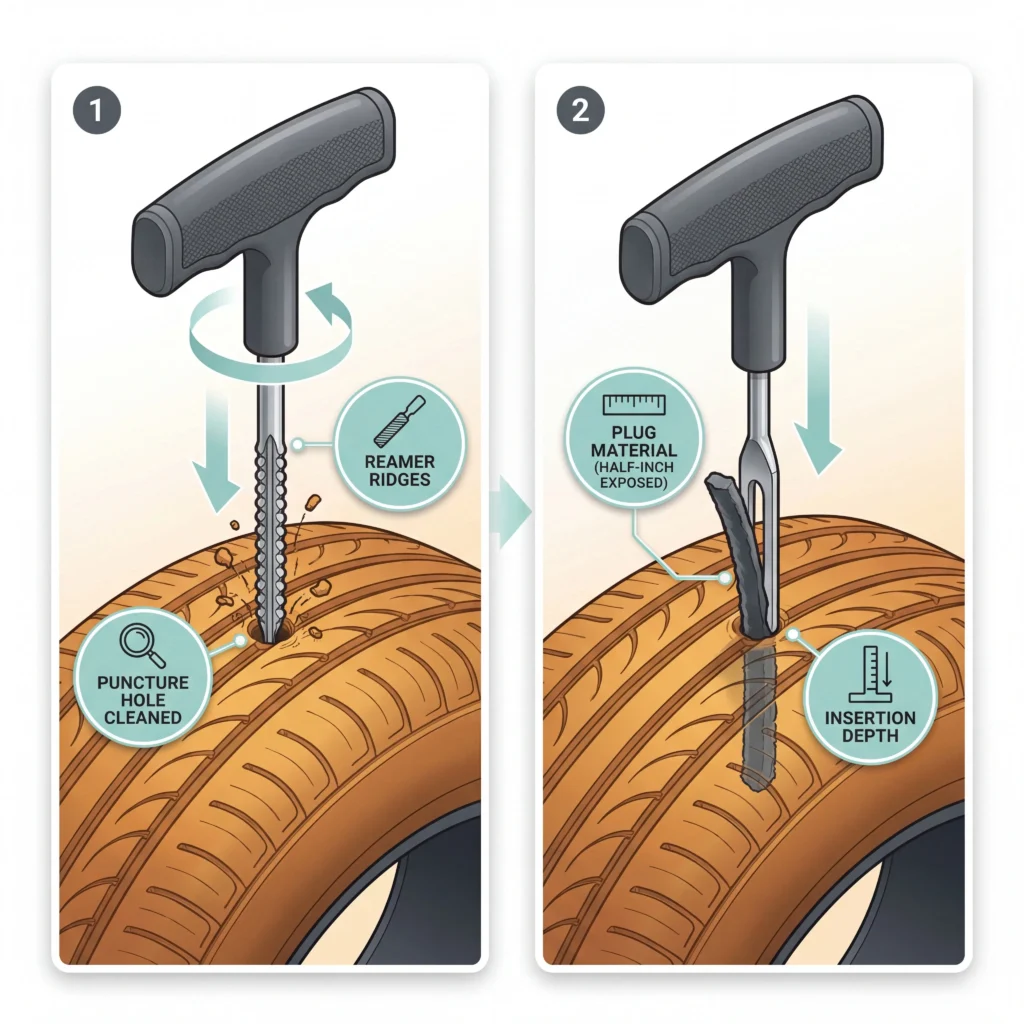
Step 3: Ream the hole. Push the reamer tool into the puncture with a twisting motion. Work it in and out several times. This feels wrong (like you’re making the hole bigger) but it’s necessary. The reamer cleans out debris and creates a surface the plug can grip. Don’t skip this step, trust me. Be careful with the reamer since it’s essentially a sharp file.
Step 4: Prep the plug. Thread a plug through the eye of the insertion tool so equal amounts stick out each side. Coat the whole thing in rubber cement if your kit includes it. Remember the gloves if you’re handling the cement directly.
Step 5: Insert the plug. Push the insertion tool straight into the hole until only about half an inch of plug material shows outside the tire. This takes some force. Don’t be gentle.
Step 6: Pull the tool out. One quick, straight motion. The split eye releases the plug while it stays seated in the tire.
Step 7: Trim the excess. Cut the plug flush with the tread surface. Leaving long tails can cause them to catch and pull out.
Step 8: Inflate and check your work. Inflate the tire to the pressure listed on your door jamb (usually 32-35 PSI for most passenger vehicles). Then spray the repair with soapy water. No bubbles means you’re good to go. Bubbles mean you need to try again or admit defeat and call for help.
The whole process takes ten minutes once you’ve done it before. Your first time might take longer, and that’s totally fine.
When Tire Plugs Are Safe to Use
Tire plugs work well in specific situations. Outside those situations, they’re either ineffective or outright dangerous. Here’s where they’re actually appropriate.
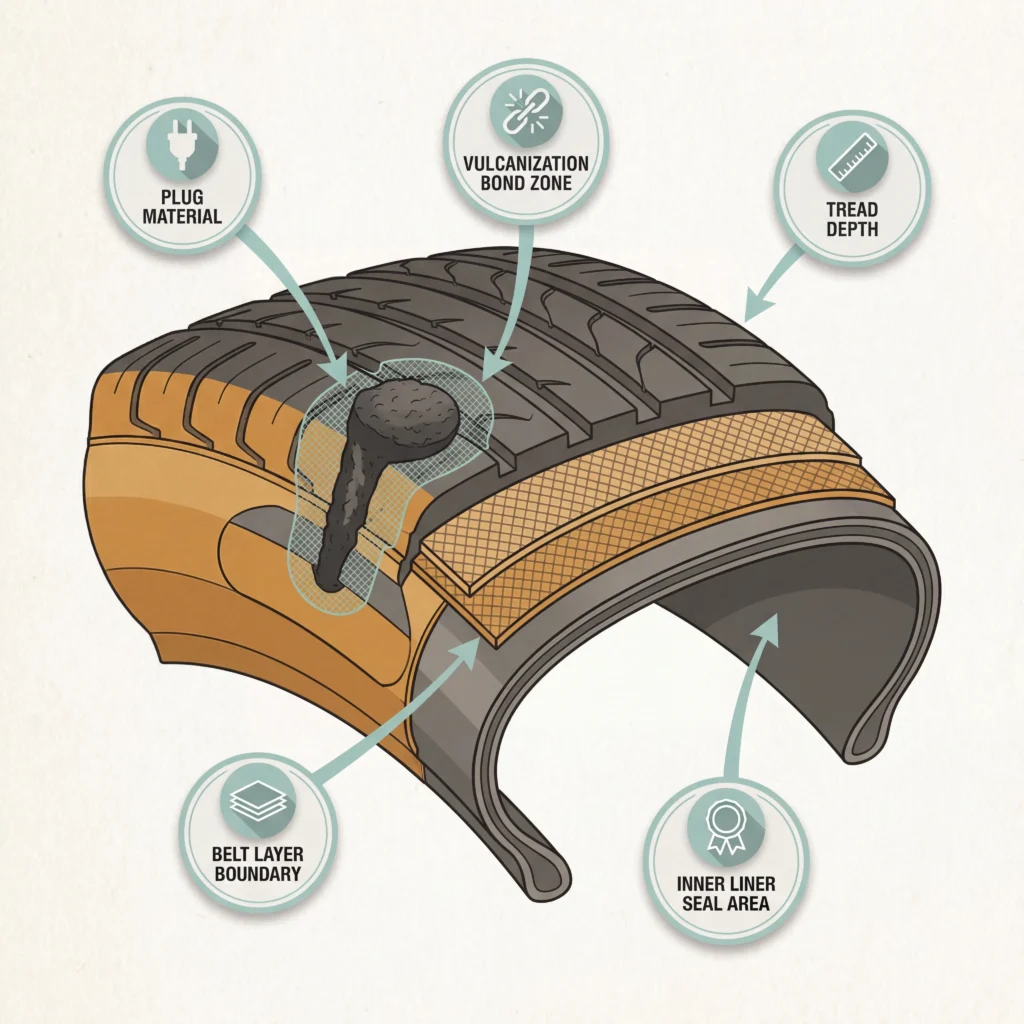
The puncture is in the tread area. This means the flat part of the tire that contacts the road. There’s roughly a band of usable area that starts about an inch and a half from each sidewall. Anything in this zone is fair game for a plug.
The hole is small. Most industry guidelines say a quarter inch diameter or smaller. That covers nails, screws, and small debris. If the puncture is wider than a pencil eraser, it’s probably too big for a standard plug.
The puncture is relatively straight. Angled punctures are trickier to seal because the plug doesn’t fill the channel properly. If the object went in at a steep angle, a plug might not hold.
The tire hasn’t been driven flat. Running a tire with no air pressure damages the internal structure in ways you can’t see from outside. If you drove any distance on a completely flat tire, a plug won’t fix the underlying damage.
No previous repairs overlap this spot. Plugging over or right next to an existing repair compromises both fixes. If the puncture is near old damage, the tire probably needs replacing.
When all these conditions line up, a plug is a totally reasonable repair. I’ve had plugged tires last for years and tens of thousands of miles.
When Tire Plugs Will Not Work
Some punctures just can’t be plugged. Trying anyway wastes your time and might put you in a dangerous situation later.
Sidewall damage is a hard no. The sidewall flexes constantly while you drive. Plugs can’t handle that movement and will work loose or cause a blowout. If the puncture is on the side of your tire rather than the tread face, you need a new tire. Period. Garrett’s piece on tire sidewall damage goes deeper into why this is such a big deal structurally.
Large punctures won’t seal. Anything bigger than a quarter inch needs a proper patch or a new tire. Big holes let too much air escape and plugs just fall out or blow through.
Shoulder area punctures are risky. The shoulder is that curved transition zone between the tread and sidewall. It’s technically possible to plug here, but the flex in this area makes plug failure more likely. Most shops won’t touch these.
Run-flat tires have special rules. The reinforced sidewalls on run-flats mean the internal structure handles forces differently. Most manufacturers say don’t plug them at all. Check our guide on patching run flat tires if you’re dealing with that situation.
Old or damaged tires aren’t worth plugging. If your tread is already worn down or you can see cracking in the rubber, a plug just delays the inevitable. Old tires with visible dry rot won’t hold a seal properly anyway. Put your fifteen dollars toward a replacement instead.
Check your tire warranty. Some tire manufacturers won’t honor warranty claims on plugged tires. If you have a newer tire still under warranty, a shop repair might be the smarter financial move.
When in doubt, have a shop look at it. A professional inspection costs less than a blowout on the highway.
Tire Plug Lifespan and Safety
The question everyone asks: how long will this actually last?
Industry sources claim a properly installed plug can last seven to ten years or the remaining life of the tire. That’s the optimistic take. Reality varies quite a bit depending on installation quality, driving conditions, and how big the original puncture was.
I had a plug hold for about three years on a commuter car with no issues whatsoever. I’ve also had one start leaking after a month (my fault for rushing the job and not reaming the hole properly). The tire itself was fine once I had a shop do a proper patch.
The Rubber Manufacturers Association and Tire Industry Association both say a plug alone isn’t a proper repair. Their recommended method is a combination plug-patch installed from inside the tire. This is technically true from a liability standpoint. It’s also more repair than most people need for a simple nail hole.
Here’s what affects longevity:
Installation quality matters most. A well-seated plug with good cement coverage beats a sloppy job every time. Take the extra minute to do it right.
Heat cycling degrades the seal. Tires get hot when you drive and cool down when you stop. This expansion and contraction slowly works at the plug. Highway driving means more heat cycles.
The original hole size matters. Smaller punctures seal more reliably. A plug in a tiny nail hole will outlast one in a larger screw hole.
Your driving style plays a role. Aggressive driving, heavy loads, and underinflation all stress the repair more.
For a solid overview of plug durability specifics, check out our detailed guide on how long a tire plug lasts. It covers the warning signs that your plug is failing and when you should think about a more permanent fix.
If you want maximum peace of mind, treat the plug as a temporary repair and have a shop install a proper plug-patch combo within a few weeks. A shop repair typically runs twenty-five to thirty-five dollars, which isn’t bad for the extra security. If you’re comfortable with some uncertainty, a good plug can absolutely last years.
FAQ
How long can you drive on a tire plug?
There’s no official mileage limit, and I know people who’ve driven plugged tires for tens of thousands of miles without problems. The more honest answer is that it depends entirely on how well you installed it and where the puncture was. A quality plug in the center of the tread can last the life of the tire. A rushed job or a puncture near the shoulder might start leaking in weeks. Check your plugged tire regularly for the first few hundred miles. If it’s holding air, you’re probably fine to keep driving.
Is a tire plug as good as a patch?
Not quite. A plug seals from the outside, which means moisture and debris can still get into the tire through the puncture channel. A patch seals the inner liner. The ideal repair (and what shops actually recommend) is a combination plug-patch that does both. That said, for a straightforward nail hole in the tread, a plug-only repair works fine for most drivers. If you’re the cautious type or you’re dealing with an expensive tire, spring for the shop repair. Our comparison of tire plug vs patch methods breaks down the differences in more detail.
Is it safe to drive with a plug in your tire?
Yes, assuming you installed it correctly in an appropriate location. Millions of people drive on plugged tires every day without incident. The safety concerns come from plugging sidewall damage (never do this), plugging holes that are too large, or driving on a plug that’s leaking. After any plug repair, check the tire pressure daily for a week or so. If it’s holding steady, you’re good. If you’re losing air, the plug either failed or there’s additional damage you missed.
Are brown or black tire plugs better?
Honestly, the color doesn’t matter much. Brown plugs are sometimes marketed as having more natural rubber content, which supposedly creates a better seal. Black plugs may contain more synthetic compounds. In practice, the quality of the specific product matters way more than the color. I’ve used both with similar results. Grab whatever your local store carries and don’t overthink it. Focus on proper installation technique instead.
What if the plug won’t stay in the hole?
This usually means one of three things: the hole is too big for a standard plug, you didn’t ream it properly, or the puncture is at an angle that won’t hold a seal. Try reaming again with a few more passes to rough up the surface. If the plug still pushes out when you release pressure, the hole might be too large or too angled for a DIY fix. At that point, you’re looking at either a shop repair or a new tire. Don’t keep forcing it, as you’ll just waste plugs and frustration.
What to Do Next
Tire plugs are one of those tools that seem intimidating until you actually use one. The first repair takes the longest. After that, it’s just part of basic car maintenance.
Here’s what to keep in mind:
Plugs work for small punctures in the tread area only. Always ream the hole before inserting the plug. Work in a ventilated area and wear gloves when handling the cement. Treat it as a temporary fix if you want maximum safety, and check the repair regularly for the first few weeks.
If you’re putting together an emergency kit for your car, a plug kit is worth the space. Combined with a portable air compressor, you can handle most roadside flat situations without waiting for help.
For the complete picture on what to do when you get a flat, head back to our main guide on how long you can drive on a spare tire. It covers your options from the moment you hear that dreaded hissing sound.
You’ve got this, and your tire will thank you for learning to fix it properly.
— Corinne
