
Brake pads wear at different rates depending on your driving conditions, pad compound, and vehicle weight. The real question isn’t whether they’ll need replacing; it’s knowing when. Most drivers wait until they hear grinding or feel vibration, but by that point, the damage often extends beyond the pads themselves. A visual inspection takes less than fifteen minutes and can save you from a repair bill that includes scored rotors.
New brake pads typically measure between 10-12mm of friction material. The replacement threshold sits at 3mm or below. Between those numbers is where most of the uncertainty lives. This guide walks through exactly how to check your brake pads, with and without removing the wheel, what thickness measurements actually mean, and the warning signs that indicate it’s time to act.
This is part of the complete brake pad inspection and maintenance guide covering everything from measurement to replacement timing.
Safety Notice: Brake inspection involves working around heavy vehicle components. Always use proper jack stands, wear safety glasses, and work on a level surface. The techniques described here reflect personal experience and may not apply to all vehicles. For safety-critical brake work including replacement, consult a certified mechanic. Prices mentioned were accurate as of early 2026 but may vary by location and retailer.
Why Checking Your Brake Pads Matters
Your brake pads convert forward momentum into heat through friction. Every time you press the brake pedal, a small amount of friction material wears away. This process is normal; the concern is knowing how much material remains before performance degrades.
The front brakes handle roughly 70% of your vehicle’s stopping power due to weight transfer during braking. This means front pads wear faster than rears on most vehicles. I’ve measured differences of 2-3mm between front and rear pads on the same vehicle after identical mileage, which is why checking all four corners matters.
Waiting for audible warning signs (that high-pitched squeal) means the wear indicator tab is already contacting the rotor. At that point, you’re within 1-2mm of metal-on-metal contact. The cost difference between replacing pads alone versus pads and rotors together can be significant: pads typically run $30-75 per axle for parts as of early 2026, while adding rotor replacement doubles or triples that figure.
Regular inspection also reveals problems beyond wear. Uneven pad thickness across left and right sides can indicate caliper issues. Contamination from brake fluid leaks shows up as a glossy surface on the friction material. These are things you won’t catch by listening alone.
For more on replacement timing and mileage intervals, see how often to replace brake pads.
Tools You Need to Inspect Brake Pads
A basic inspection requires minimal equipment. For checking through the wheel spokes, you need a flashlight and possibly a small mirror. For a thorough inspection with the wheel removed, gather these items before starting:
Essential tools: A lug wrench matching your vehicle’s lug nut size (most are 17mm, 19mm, or 21mm), a floor jack rated for your vehicle’s weight, jack stands (never work under a vehicle supported only by a jack), and a flashlight.
Measurement tools: A brake pad gauge provides quick readings in millimeters. These cost $5-15 and give you a documented baseline for tracking wear over time. A digital caliper works too, though it’s harder to position accurately in tight spaces. Some mechanics use a simple ruler, measuring from the backing plate to the rotor surface.
Optional but useful: Mechanic gloves protect your hands from brake dust (which contains metal particles), and safety glasses prevent debris from falling into your eyes when looking up at the caliper assembly.
The brake pad gauge guide covers different gauge types and how to read them accurately.
Worth noting: brake dust accumulates on wheels as pads wear. A sudden decrease in brake dust on your wheels can actually indicate pads are nearly worn through, since there’s less friction material left to shed.
How to Check Brake Pads Without Removing the Wheel
You can often assess pad condition through the wheel spokes without any tools beyond a flashlight. This method works well for routine checks between more thorough inspections.
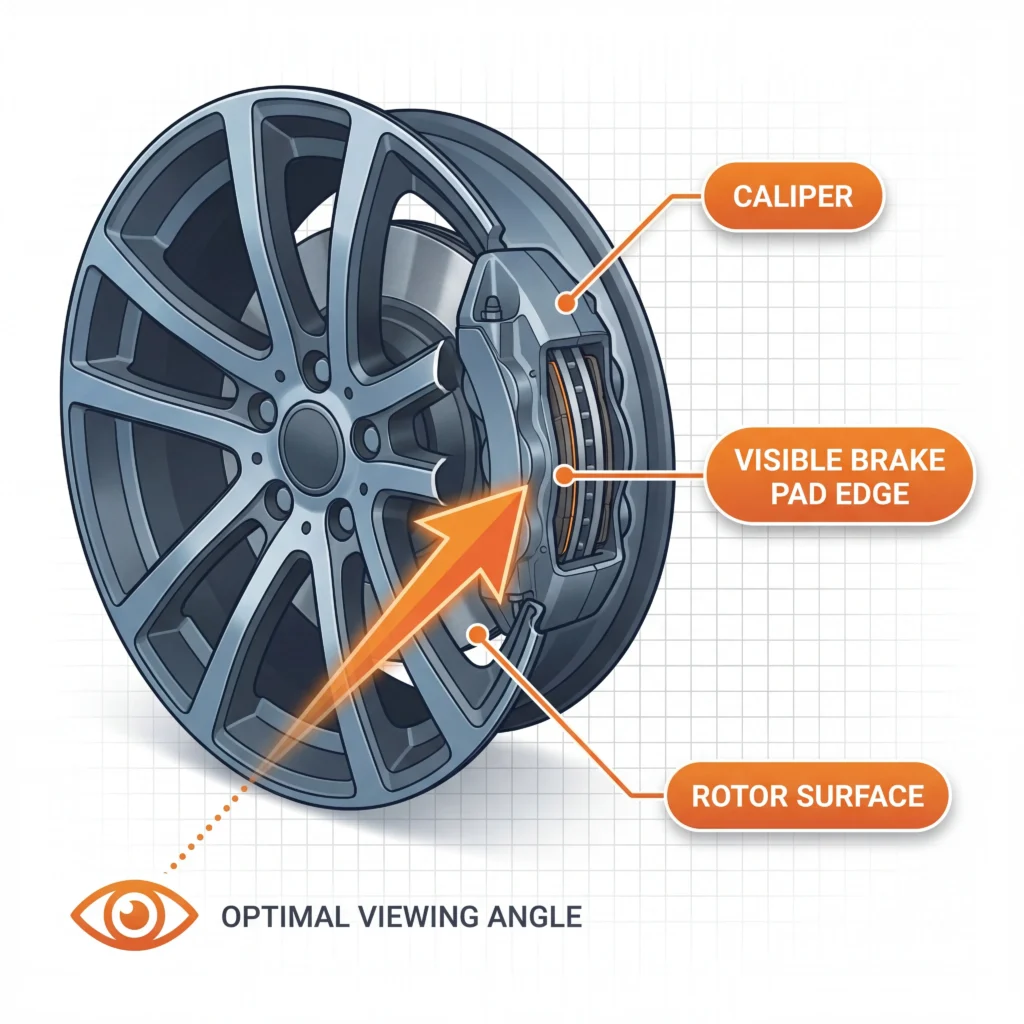
Step 1: Position yourself so you can see through the wheel spokes toward the brake caliper. Turn the steering wheel to full lock (left for left-front, right for right-front) to improve your viewing angle on front brakes.
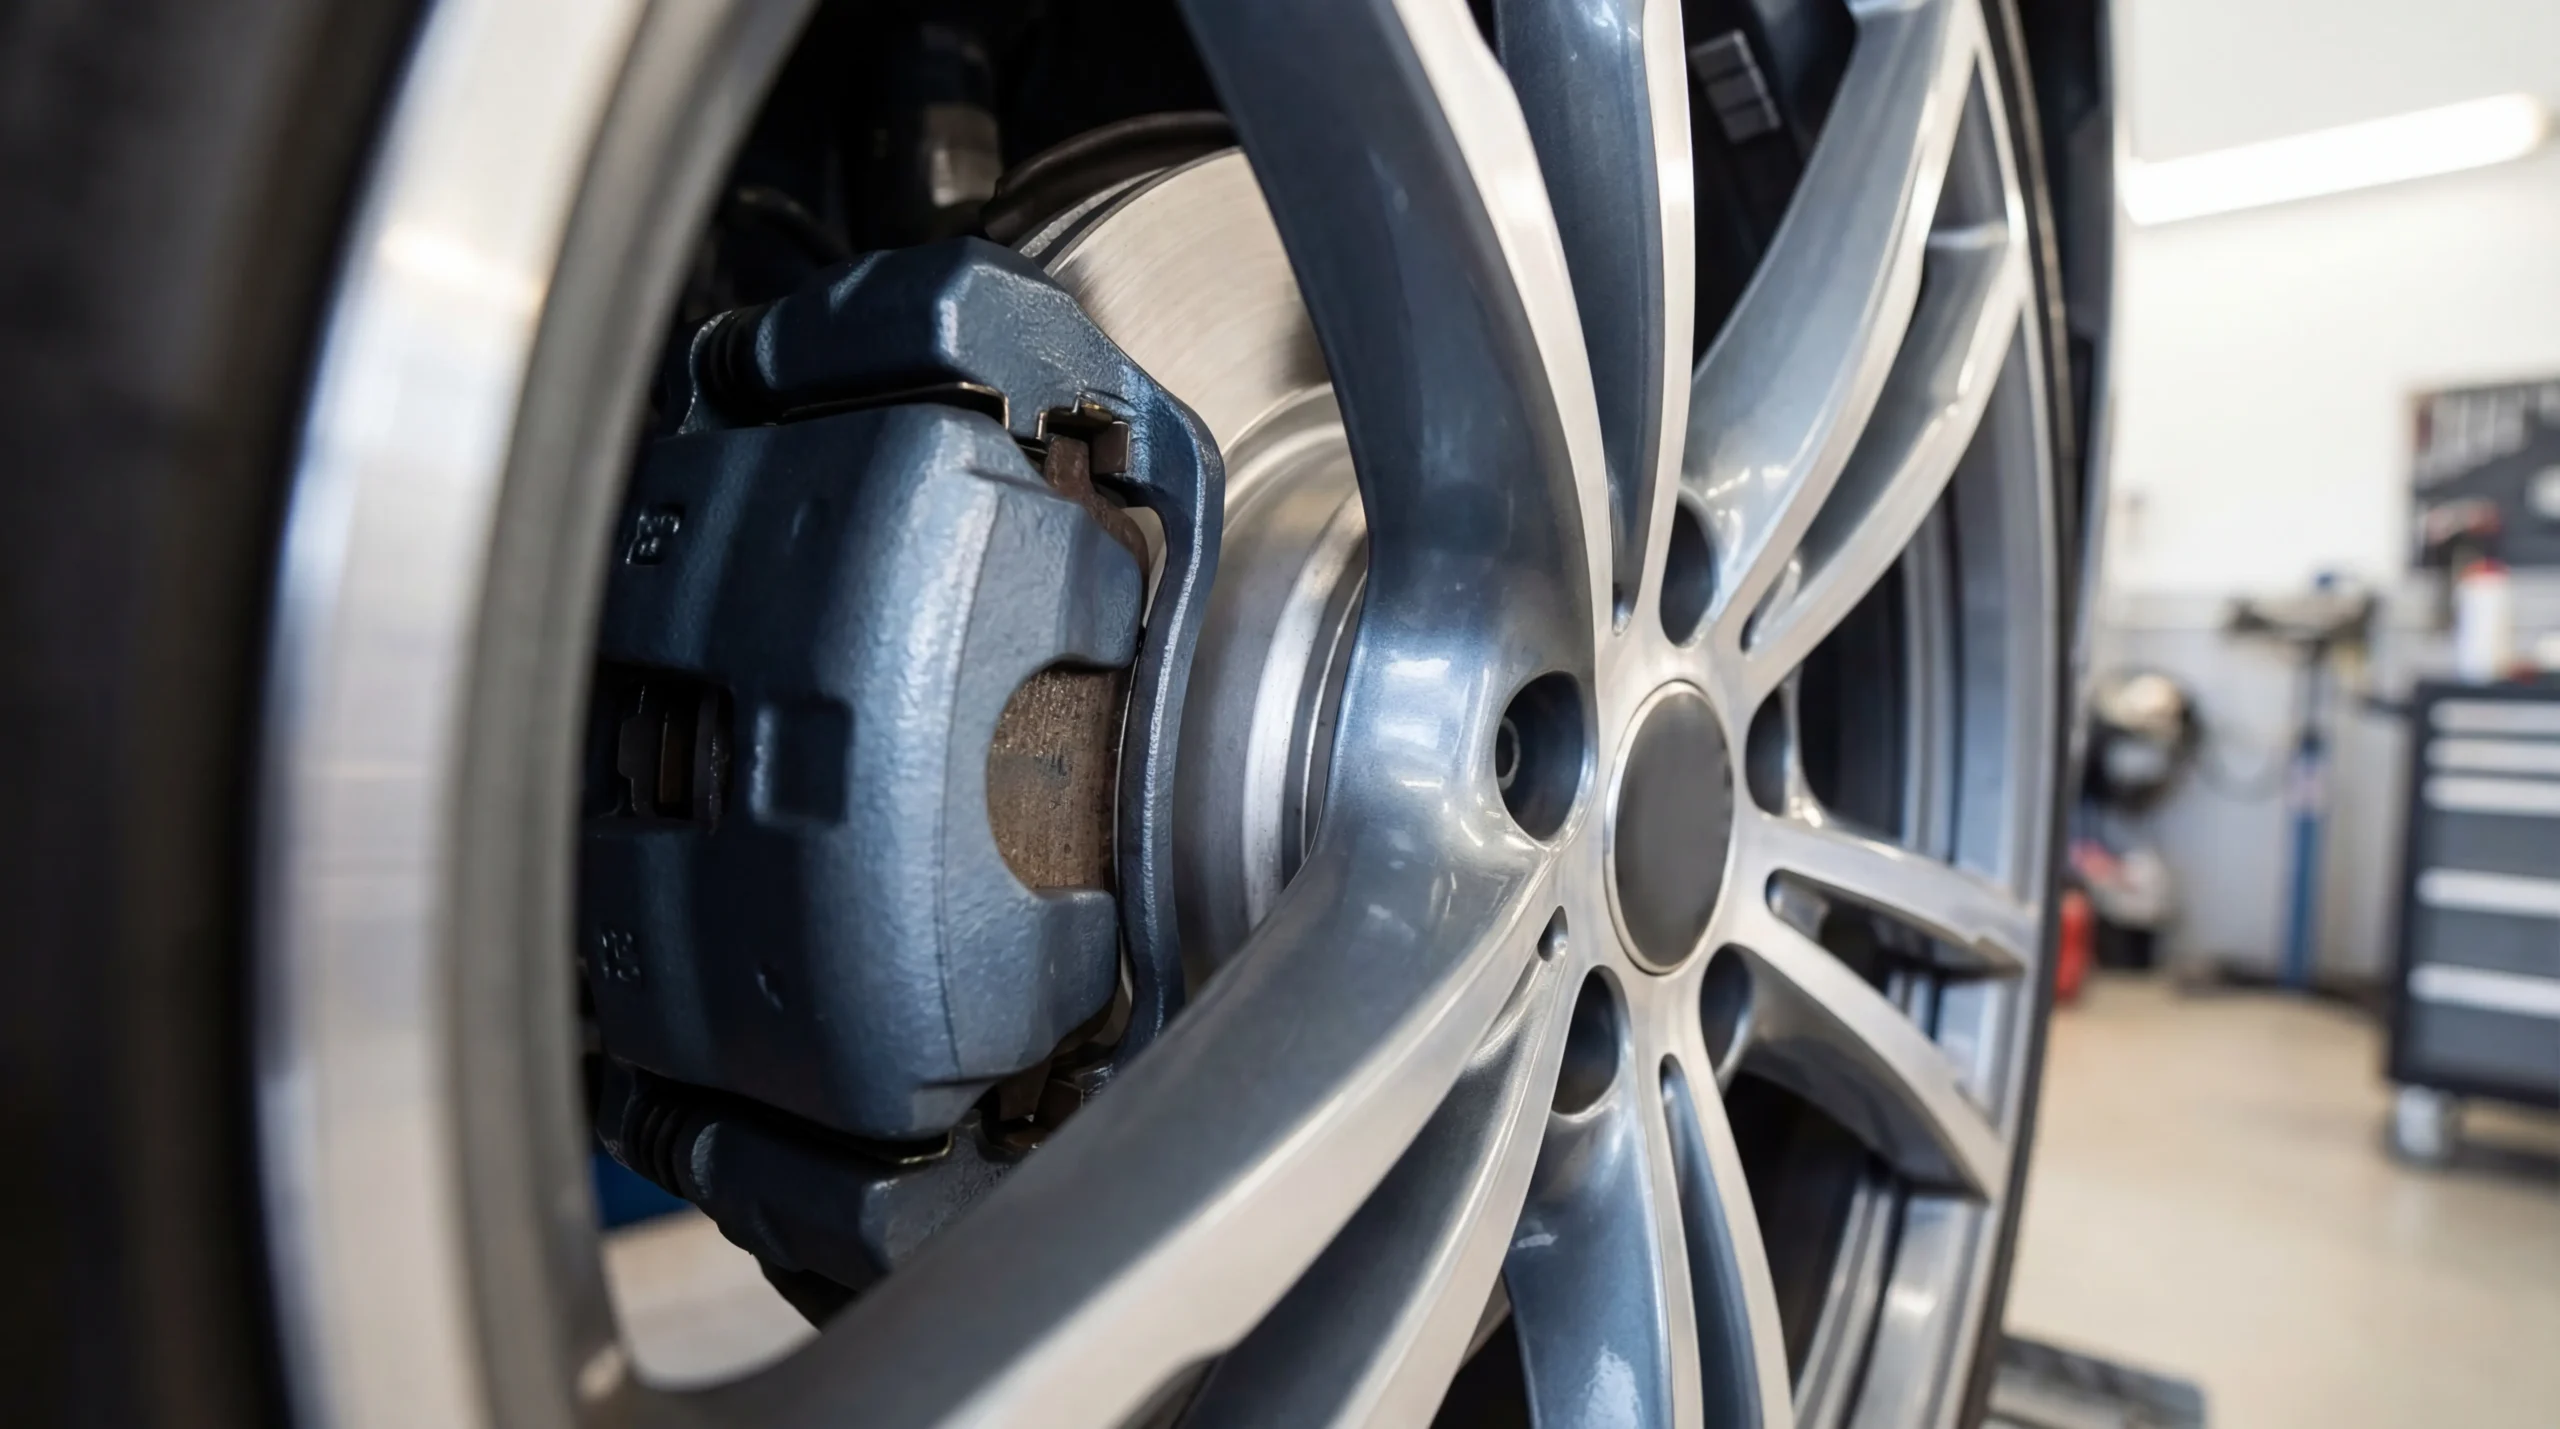
Step 2: Locate the brake caliper. It’s the metal housing that straddles the rotor (the shiny disc behind the wheel). The brake pad is visible as a flat surface pressed against the rotor, housed within the caliper.
Step 3: Estimate the friction material thickness. New pads show 10-12mm of material above the backing plate. If you see less than 4mm, or roughly the thickness of two stacked nickels, schedule a replacement. Below 3mm requires immediate attention.
Step 4: Look for the wear indicator slot. Many pads have a groove cut into the friction surface. When this groove disappears or becomes barely visible, the pad has reached its wear limit.
This method has limitations. You typically see only the outer pad; the inner pad (closest to the piston) often wears faster and remains hidden from this angle. Vehicles with smaller wheel openings or solid wheel covers require wheel removal for accurate assessment.
The distinction matters because uneven inner-to-outer wear indicates potential caliper slide pin issues. If you’re seeing acceptable outer pad thickness but hearing squealing, the inner pad may tell a different story.
How to Check Brake Pads After Removing the Wheel
Removing the wheel gives you access to both pads and allows inspection of the caliper, rotor, and brake lines simultaneously. This is the method I use for documented inspections.
Preparation: Park on a level surface and engage the parking brake. Loosen the lug nuts one-quarter turn before lifting the vehicle. Position the jack under a designated lift point (check your owner’s manual; using the wrong location can damage the undercarriage).
Lifting procedure: Raise the vehicle until the tire clears the ground by about 6 inches. Place a jack stand under the frame or designated support point. Lower the jack until the vehicle rests on the stand. Never work under a vehicle supported only by a hydraulic jack.
Wheel removal: Remove the loosened lug nuts and pull the wheel straight off. Set it aside flat to avoid rolling.
Pad inspection: With the wheel off, you can see both the inner and outer pads clearly. The outer pad faces you; the inner pad sits between the caliper piston and the rotor. Measure both pads at their thinnest point. A difference greater than 2mm between inner and outer suggests the caliper slides aren’t moving freely.
What else to check: While you’re there, examine the rotor surface for scoring (grooves deeper than a fingernail catches) and heat spots (blue or dark discoloration). Look at the brake line where it connects to the caliper for signs of cracking or fluid seepage. Check that the caliper slides move smoothly; seized slides cause uneven wear.
Garrett covers the rotor inspection side in more detail in his brake drums and caliper guide, including how to measure rotor thickness and identify warping.
Reinstallation: Mount the wheel and hand-tighten the lug nuts in a star pattern. Lower the vehicle until the tire contacts the ground but doesn’t bear full weight. Torque the lug nuts to your vehicle’s specification (check your owner’s manual; typical range is 80-100 ft-lbs for many passenger vehicles, but this varies). Lower fully and verify torque.
What Brake Pad Thickness Is Too Thin
The numbers tell a clearer story than generalizations. Here’s what the measurements actually mean:
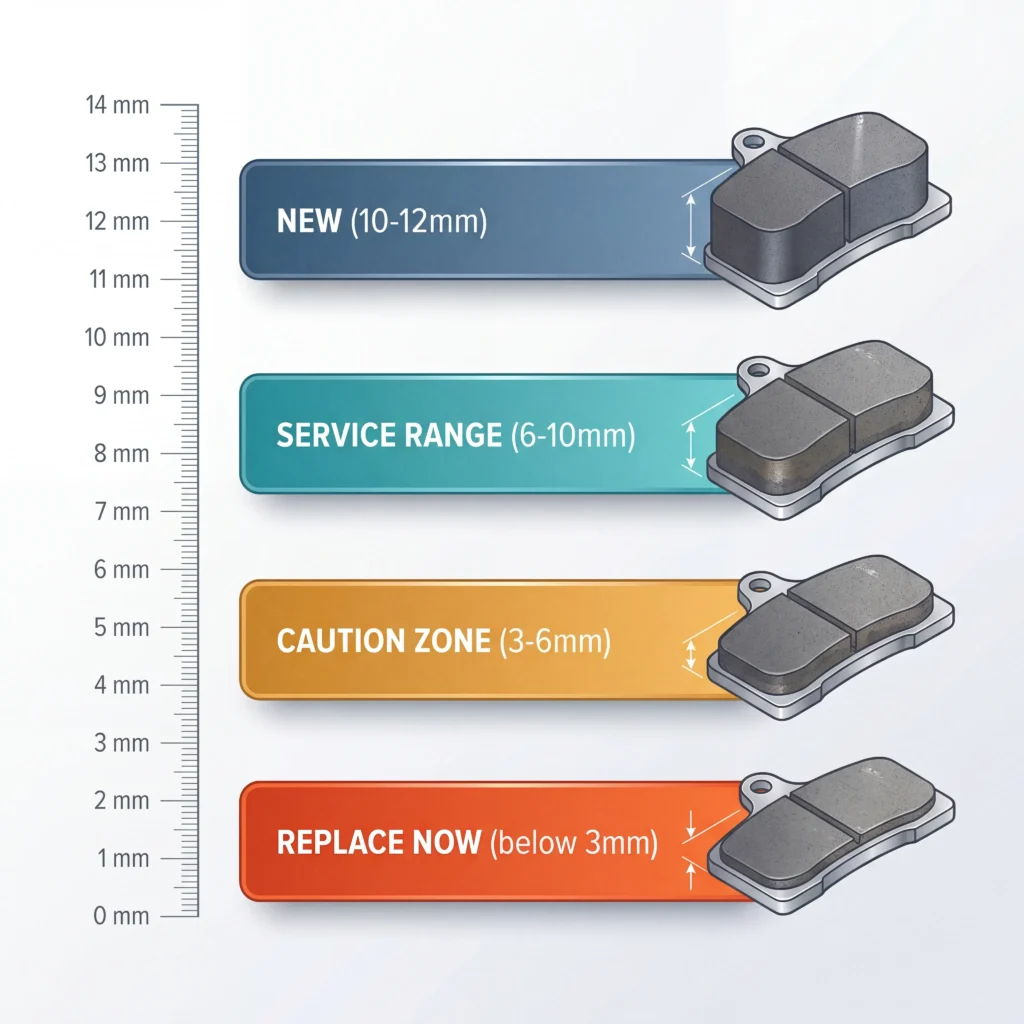
New pads: 10-12mm of friction material. This is your baseline for tracking wear rate.
Service range: 6-10mm. Pads are wearing normally. Continue monitoring at regular intervals.
Caution zone: 3-6mm. Schedule replacement soon. You have some margin, but don’t delay beyond your next service interval.
Replace immediately: Below 3mm. At this thickness, you’re approaching the backing plate. Continuing to drive risks rotor damage and compromised stopping distance.
The 30-30-30 benchmark: This informal guideline suggests replacing pads when they reach 30% of original thickness, or approximately 3mm. It also notes that most pads last roughly 30,000 miles under typical driving conditions, though this varies significantly based on driving style, vehicle weight, and pad compound. The third “30” sometimes refers to the approximate time in minutes for a basic DIY replacement, though first-timers should expect longer.
One factor that affects these numbers: some manufacturers build pads thicker than 12mm for specific applications. Truck pads and performance compounds may start at 14-15mm. Measure your new pads when installing them to establish an accurate baseline.
For detailed thickness specifications by vehicle type, see the brake pad thickness guide.
Signs Your Brake Pads Need Replacing
Beyond measuring thickness, several indicators signal pad wear or related problems:

Audible Wear Indicator
That high-pitched squeal when braking (not the occasional squeak from moisture) comes from a metal tab designed to contact the rotor when pads reach minimum thickness. This is your built-in warning system. If you hear it consistently, the pads are at 1-2mm.
Grinding Noise
Metal-on-metal contact means the friction material is gone. The backing plate is now grinding against the rotor, causing damage with every brake application. This requires immediate attention.
Increased Stopping Distance
Thin pads have less friction material to grip the rotor. If your vehicle takes noticeably longer to stop, brake inspection should be your first diagnostic step.
Pedal Vibration or Pulsation
While this often indicates rotor warping rather than pad wear, worn pads can contribute to uneven rotor wear that causes pulsation. The two problems frequently occur together.
Visual Dust Changes
Brake dust on your wheels comes from pad material wearing away. A sudden decrease in brake dust (cleaner wheels than usual) can mean there’s little pad material left to shed.
Dashboard Warning Light
Vehicles with electronic wear sensors display a brake warning when pads reach minimum thickness. This sensor is a single-use component; it triggers once and needs replacement with the pads. Not all vehicles have this feature, and those that do typically monitor only one pad position.
What Can Be Mistaken for Bad Brakes
Several issues mimic brake problems but stem from different causes. Wheel bearing noise can sound like brake grinding but continues even when you’re not braking. Warped rotors cause pulsation without necessarily indicating pad wear. A sticking caliper makes noise and causes pulling, but the pads themselves may have adequate material. ABS activation during normal braking suggests a sensor or module issue rather than pad condition. Proper diagnosis requires inspecting the pads directly rather than assuming based on symptoms alone.
For more on what triggers dashboard brake warnings, see the brake pad wear sensor guide.
How Often Should You Check Brake Pads
Inspection frequency depends on driving patterns more than calendar time. The documented recommendation from most manufacturers is every 12,000-15,000 miles or during tire rotations, whichever comes first.
High-wear drivers should check more often: If you drive primarily in stop-and-go traffic, live in hilly terrain, tow regularly, or drive a heavier vehicle, pads wear faster. Checking every 10,000 miles or every other oil change makes sense for these conditions.
Low-wear drivers can extend intervals slightly: Highway commuters who rarely encounter heavy traffic may find pads lasting 50,000+ miles. Even so, a visual check during seasonal tire changes takes minimal effort.
First-year tracking: If you’re new to a vehicle or just installed new pads, check thickness at 5,000 and 10,000 miles to establish your personal wear rate. This baseline tells you how long your driving style takes to consume the friction material.
Integration with other maintenance: Brake inspection pairs naturally with tire rotation (wheels are already coming off) and with any suspension or steering work. Building it into your existing maintenance schedule ensures it doesn’t get overlooked.
The complete guide on brake pad replacement intervals covers mileage expectations by pad type and driving conditions.
FAQ
What is the 30-30-30 rule for brakes?
The 30-30-30 rule provides a simple benchmark: replace pads at 30% remaining thickness (roughly 3mm), expect approximately 30,000 miles of pad life under typical conditions, and budget about 30 minutes for a straightforward replacement. The mileage figure varies considerably based on pad compound, vehicle weight, and driving habits. I’ve seen pads last 20,000 miles in city driving and 60,000+ on highway commuters with lighter brake use.
How can I tell if brake pads need replacing?
Measure the friction material thickness directly. Below 3mm requires replacement. Audible squealing from the wear indicator, grinding sounds, increased stopping distance, or a dashboard brake warning also signal worn pads. Visual inspection through wheel spokes or with the wheel removed gives you a definitive answer rather than guessing from symptoms.
Can you check brake pads without removing tires?
In many cases, yes. Turn the steering wheel to full lock, use a flashlight, and look through the wheel spokes at the caliper. You can see the outer pad and estimate its thickness. The limitation is that you can’t see the inner pad (which often wears faster) without removing the wheel. For a thorough assessment, wheel removal is worth the extra time.
What can be mistaken for bad brakes?
Several issues mimic brake problems. Wheel bearings produce grinding sounds that continue even when not braking. Warped rotors cause pedal pulsation without indicating pad wear. Sticking calipers create noise and pulling but may not mean the pads need replacement. ABS system faults can feel like brake problems during activation. Direct inspection eliminates the guesswork.
Do front and rear brake pads wear at the same rate?
Front pads typically wear faster than rears because the front brakes handle approximately 70% of stopping force during normal braking (weight transfers forward when you slow down). On the same vehicle, I’ve measured front pads at 5mm while rears still showed 8mm after identical mileage. Always check all four corners rather than assuming uniform wear.
How accurate are electronic brake pad wear sensors?
Electronic sensors provide a single-point measurement, typically on the inner pad of one wheel per axle. They trigger a dashboard warning when that specific pad reaches minimum thickness but won’t detect uneven wear on other positions. Think of them as a backup warning rather than a replacement for visual inspection. The sensor itself is a single-use component that needs replacement along with the pads.
Putting It Together
Brake pad inspection doesn’t require advanced mechanical skill. The procedure comes down to measurement and observation: check thickness at the thinnest point, compare inner to outer pads, and look for signs of uneven wear or related issues.
Key measurements to remember:
- New pads: 10-12mm
- Schedule replacement: below 4mm
- Replace immediately: below 3mm
Inspection checklist:
- Both inner and outer pads on all four wheels
- Thickness difference between left and right sides
- Rotor surface condition (scoring, heat spots)
- Caliper slide movement and brake line condition
When to go beyond DIY inspection:
- Any measurement discrepancy you can’t explain
- Signs of fluid contamination on pad surfaces
- ABS warning light combined with brake symptoms
- Uncertainty about what you’re seeing
If you’re uncertain about any aspect of your brake system, a professional inspection provides peace of mind and catches issues that visual checks might miss. A certified mechanic can also verify that your calipers, rotors, and hydraulic system are functioning correctly.
Start with a visual check through the wheel spokes during your next tire pressure check. If anything looks questionable, remove the wheel for a closer look. Document what you find; that baseline becomes your reference for tracking wear rate over time.
For the complete picture on brake pad maintenance, return to the brake pad inspection and maintenance guide.
— Rohan Pettis
