Quick version: a brake caliper rebuild kit contains the wear parts that seal a caliper, the pressure seals, dust boots, O-rings, bleeder screw and caps, assembly grease, and small hardware, but most kits do not include the piston. It is worth using when the caliper body and bore are in good shape and only the seals and piston are worn, since a kit runs about 10 to 30 dollars against 50 to 150 dollars or more for a replacement. If the bore is deeply scored or the body is cracked, rebuild is off the table and you replace the caliper. Either way, you must bleed the brakes afterward.
What is actually in the kit
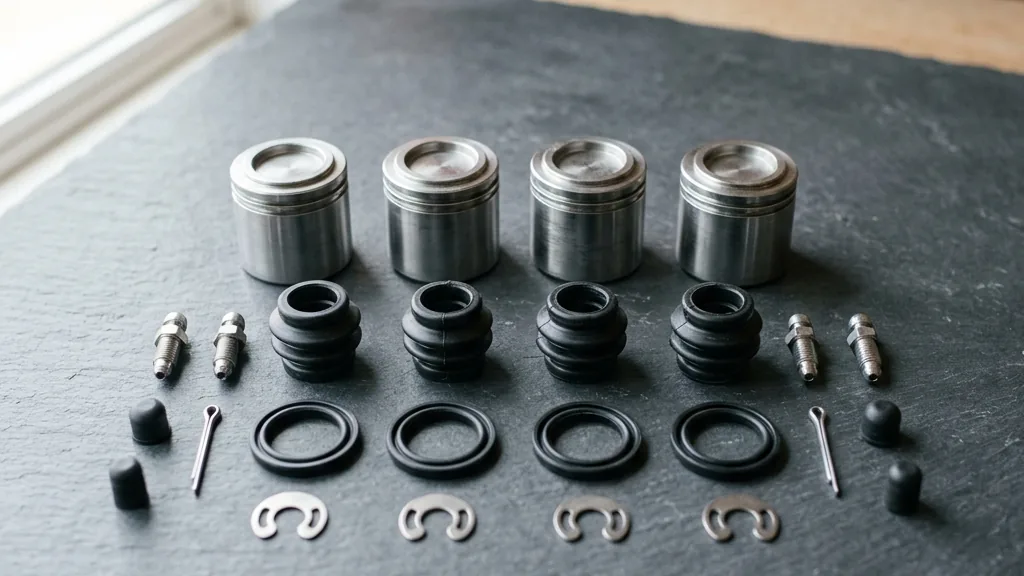
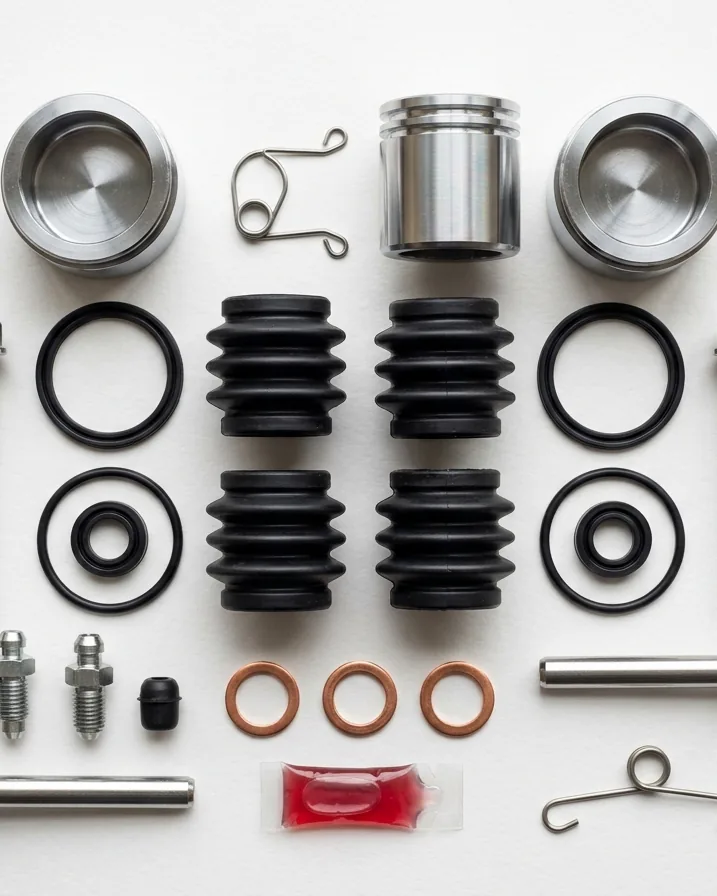
The first thing to get straight is what you are buying, because the name oversells it slightly. A rebuild or repair kit supplies the soft parts that make a caliper seal and the small bits that go with them, not a whole caliper.
| In most kits | Usually NOT in the kit |
|---|---|
| Pressure (piston) seals | The piston itself |
| Dust boots | Caliper body / bracket |
| O-rings, bleeder screw and caps | Brake pads |
| Rubber assembly grease, small hardware | Brake hose, crush washers (sometimes) |
The piston is the part that catches people out: kits “generally include all the necessary seals, O-rings and hardware” but leave out the piston, so if yours is scored or pitted you order it on its own. Read the kit listing before you buy, and inspect your piston early so you are not stranded mid-job.
When a rebuild kit is worth it
A rebuild is an economical fix in a specific situation, and a waste of effort outside it. It makes sense when the caliper body is sound and the bore, the cylinder the piston rides in, is smooth, and only the seals have hardened or the piston has light surface wear. In that case a kit costing roughly 10 to 30 dollars restores a caliper that would otherwise cost 50 to 150 dollars or more to replace with a new or remanufactured unit, and you keep the original casting. It stops being worth it the moment the bore is deeply scored or pitted, the piston is corroded beyond a light clean-up, or the aluminum or cast-iron body is cracked, because no seal will hold against a damaged surface. The honest test is the bore: if it will not clean up to a smooth finish, buy the caliper.
Rebuild versus replace, decided quickly
Plenty of drivers agonize over this, but the decision is mostly mechanical. Choose a rebuild when the caliper still slides and clamps, the body is intact, and the leak or sticking traces to tired seals or a lightly marked piston, all of which a kit addresses cheaply. Choose replacement when you see a cracked body, a bore with deep scoring or pitting you can feel with a fingernail, a seized piston that will not free up, or when you simply lack the tools, time, or confidence for hydraulic work. A remanufactured caliper also makes sense if both calipers on an axle are high-mileage, since replacing them in pairs keeps braking even. Neither choice is wrong; the point is to match the fix to the damage rather than to the price tag alone.
How a caliper rebuild goes, step by step
The process is methodical, and the order matters for both safety and results.
- Remove and drain. Take off the brake pads, disconnect the brake line, unbolt the caliper, and drain the old fluid.
- Push out the piston. With the caliper off the car, use a jet of compressed air with a rubber tip to ease the piston out far enough to remove by hand. Keep fingers clear.
- Remove the old seals. Pick out the pressure seal carefully with a plastic or brass tool, taking care not to scratch the bore or the seal groove.
- Clean and inspect. Clean everything with brake cleaner and examine the bore; light marks are fine, deep scoring means replace the caliper.
- Install new seals and piston. Coat the new seal in assembly lube, seat it in the groove, fit the dust boot, and press the piston in squarely by hand.
- Reassemble and bleed. Bolt the caliper back on with new crush washers at the line, refit the pads, then bleed the brakes with fresh fluid and check for a firm pedal.
None of the steps are exotic, but each one is unforgiving of shortcuts, which is the theme of the next section.
Tools and fluid you need
Doing it right means having the right kit beside the rebuild kit. You will want compressed air with a rubber-tipped nozzle to extract pistons, plastic or brass picks so you do not gouge the bore, brake assembly lube for the seals, a torque wrench to bring fasteners to the maker’s spec, and a brake bleeding kit with fresh fluid. The fluid must be the correct grade, almost always a DOT 3 or DOT 4 that matches your reservoir cap, and it must be from a sealed bottle since brake fluid absorbs moisture once opened. Those fluid specifications come from standards published by SAE International and the Department of Transportation, which is why the grade is not interchangeable. Skimping on tools is how a money-saving rebuild turns into a scored bore and a second purchase.
The safety rules you cannot skip
This is brake work, so a few rules are non-negotiable rather than best-practice suggestions. You must bleed the system after opening it, because air in the lines gives you a soft pedal and longer stopping distances, and you must confirm a firm pedal before the car moves. Torque the caliper bolts and banjo fitting to specification, since a loose fastener on a caliper is a catastrophic failure, not a leak. Use new crush washers at the brake line so the connection seals, and test the brakes at low speed in a safe area before any real driving. The National Highway Traffic Safety Administration treats braking defects as among the most serious safety faults a vehicle can have, and a self-rebuilt caliper is only as safe as your weakest step. If any part of this makes you hesitate, stop and let a shop finish it.
Where this fits in your brake system
A caliper rebuild rarely stands alone, because the symptoms that send you here often overlap with other brake issues. A leaking caliper, for example, lowers your fluid level, which is why a rebuild and a check for low brake fluid symptoms usually go together. Sticking calipers can also wear pads unevenly and even contribute to parking-brake faults on cars that clamp the rear calipers electronically. Understanding the caliper as one node in a hydraulic system, rather than an isolated part, helps you fix the cause instead of the symptom. For the full picture of how the pieces interact, from fluid to pads to warning lights, the brake system hub ties them together.
When to hand it to a professional
There is no shame in outsourcing this one, and sometimes it is the right call. Take it to a shop if the bore is scored, if the piston is seized or corroded, if you do not have compressed air and a torque wrench, or if you are not fully confident bleeding brakes to a firm pedal. A professional rebuild or a remanufactured caliper costs more than the kit but buys a guaranteed result on a safety-critical part, which is worth a great deal. The savings from a do-it-yourself rebuild are real, but they only count if the result stops the car reliably every time. Match the job to your skills and tools honestly, and you will land on the right side of cost and safety both.

Signs your caliper needs a rebuild
Before you buy a kit, it is worth confirming the caliper is actually the problem. The classic sign of a sticking or seizing caliper is a vehicle that pulls to one side under braking, because one wheel is clamping while the other is not. A caliper that will not release fully causes that wheel to run hot, so you may notice a burning smell, a wheel that is far hotter than its partner after a drive, or uneven pad wear where one pad is worn to nothing and the other is barely touched. A leaking caliper leaves a damp, oily film on the inside of the wheel and slowly drops your fluid level, which connects directly to the low brake fluid symptoms many drivers notice first. A spongy pedal that improves after bleeding can also point to a caliper seal letting air past. If you see these signs and the caliper body is sound, a rebuild kit is exactly the right tool; if the body is cracked or the bore is scored, the same symptoms call for replacement instead.
Torque, fluid, and the numbers that matter
A safe rebuild lives and dies on specifications, so treat the numbers as non-negotiable. Caliper guide-pin and bracket bolts have defined torque values, commonly in the range of 20 to 30 foot-pounds for guide pins and 80 to 110 foot-pounds for bracket bolts depending on the vehicle, and the only correct figure is the one in your manual. The banjo bolt at the brake hose needs new copper crush washers and its own torque spec, typically around 25 to 35 foot-pounds, to seal without cracking. Use only fresh DOT 3 or DOT 4 fluid from a sealed bottle, since brake fluid absorbs moisture within hours of opening, and bleed until the fluid runs clear and the pedal is firm. After assembly, pump the pedal several times before you move, then test at 5 to 10 mph in a safe area. Organizations such as AAA stress that brake work tolerates no shortcuts, and these numbers are where shortcuts usually hide.
Common rebuild mistakes to avoid
Most failed rebuilds trace to a short list of errors. The first is scratching the bore while removing the old seal, which guarantees the new seal will leak; use only plastic or brass tools. The second is reusing a scored piston to save the cost of a separate one, when a pitted piston will chew through a fresh seal in short order. The third is skipping the dust boot or installing it wrong, which lets grit reach the seal and shortens its life dramatically. The fourth is reusing old crush washers at the brake line, which then weeps fluid. The fifth, and the most dangerous, is an incomplete bleed that leaves air in the system and a soft pedal. Each of these is easy to avoid once you know to look for it, and each is the difference between a rebuild that lasts years and one that fails within weeks.
How long a rebuilt caliper lasts
Done correctly, a rebuild is not a patch but a genuine repair. New seals and a clean piston in a sound bore restore the caliper close to factory condition, and many rebuilt calipers go on to last the better part of a decade, similar to a quality remanufactured unit. The variables are the condition of the bore you started with and the quality of the work: a bore with even light pitting will shorten seal life, and a sloppy install fails early regardless of parts. This is why the inspection step matters so much, and why honesty about the bore pays off. If you rebuild in pairs on an axle, both calipers age together and braking stays even, which is the same logic shops use when they recommend doing both sides. Treat the rebuild as real maintenance, and it earns its place against a much costlier replacement.
Bleeding the brakes: the step you cannot skip
The rebuild is only finished when the air is out, and bleeding is where careful work either pays off or unravels. Once the caliper is back on with new crush washers torqued to spec, often around 25 to 35 foot-pounds at the banjo fitting, you refill the master cylinder with fresh DOT 3 or DOT 4 and work the air out of the lines. The standard sequence starts at the wheel farthest from the master cylinder and moves closer, though some vehicles specify their own order, so check the manual. Whether you use a two-person pump-and-hold method, a vacuum bleeder, or a pressure bleeder, you continue until the fluid runs clear with no bubbles and the pedal comes up firm and high. Keep the reservoir topped throughout so you never draw fresh air back in. When you are done, pump the pedal several times to confirm it stays firm, then test the brakes at 5 to 10 mph in a safe, empty area before any normal driving.
A rebuild with a perfect seal but a sloppy bleed still gives you a soft pedal and longer stops, which defeats the entire point, so treat the bleed with the same care as the seal install. If the pedal still feels soft after a thorough bleed, do not drive the car; either air remains in the system or a seal is not sealing, and both are reasons to stop and recheck rather than hope it settles. A firm, high pedal is the only acceptable sign-off on brake work.
Frequently asked questions
What is included in a brake caliper rebuild kit?
A typical kit includes the pressure seals, dust boots, O-rings, bleeder screw and caps, rubber assembly grease, and small hardware. Most kits do not include the piston, so if yours is scored or pitted you buy it separately.
Is rebuilding a caliper worth it versus replacing it?
Rebuilding is worth it when the caliper body and bore are healthy and only the seals and piston are worn, since a kit costs about 10 to 30 dollars against 50 to 150 dollars for a new or remanufactured caliper. Replace it if the bore is deeply scored or the body is cracked.
Do you have to bleed the brakes after a caliper rebuild?
Yes. Opening the hydraulic system lets air in, so you must bleed the brakes with fresh fluid afterward and confirm a firm pedal before driving. Skipping the bleed leaves a soft pedal and unsafe braking.
How much does a caliper rebuild kit cost?
Kits are inexpensive, commonly around 10 to 30 dollars, which is the main reason to rebuild rather than replace when the caliper body is sound. A new or remanufactured caliper typically runs 50 to 150 dollars or more per corner.
Can I rebuild a caliper without removing it from the car?
Some seal jobs can be done on the vehicle, but a full rebuild is cleaner and safer with the caliper off, where you can extract the piston and inspect the bore properly. Either way, you still must bleed the brakes and verify a firm pedal afterward.
Bottom line: a brake caliper rebuild kit is a cheap, effective fix when the caliper body and bore are healthy and only the seals and piston are tired, saving you the cost of a replacement. It is the wrong choice when the bore is scored or the body is damaged, where a new caliper is the only safe answer. Whichever path you take, bleed the system, torque to spec, and test at low speed, because on brakes the only acceptable result is one that stops the car every time.
Disclaimer: This article is general automotive information, not a substitute for a service manual or professional judgment. Brake work is safety-critical; use the correct fluid and torque specs for your vehicle and have a qualified technician perform or verify the repair if you are unsure.
Sources
- National Highway Traffic Safety Administration – braking system safety guidance.
- SAE International and the U.S. Department of Transportation – brake fluid standards (DOT 3, DOT 4).
- AAA – guidance on when to repair brakes yourself versus using a professional.