By Rohan Pettis | Brake maintenance writer with years of hands-on experience | Published: March 7, 2026 | Updated: March 7, 2026 | 14 min read
Quick answer: Brake fluid should be changed every two to three years, or roughly 30,000 to 45,000 miles depending on your vehicle. However, manufacturer recommendations vary significantly: Toyota suggests every two years, Honda recommends three years, and BMW specifies mileage-based intervals. The fluid’s hygroscopic nature means it absorbs moisture over time, which lowers its boiling point and reduces braking performance. Checking your owner’s manual provides the most accurate interval for your specific vehicle.
Important Safety Notice: This guide shares personal experience with brake fluid maintenance and is for informational purposes only. Brake system work is safety-critical: improper maintenance can result in brake failure, serious injury, or death. Always wear appropriate safety gear, work in a well-ventilated area, and consult a certified mechanic if you have any doubts about the procedure. Prices and manufacturer recommendations were current at time of writing (early 2026) but may change. The author is not a licensed automotive technician. When in doubt, have a professional perform brake system service.
Table of Contents
Introduction
Brake fluid replacement is one of those maintenance items that generates conflicting advice across the internet. Some sources say every two years without exception; others claim the fluid lasts indefinitely if the system stays sealed. I’ve measured moisture content in brake fluid across several vehicles over the years, and the variation between what manufacturers recommend and what the fluid actually looks like at those intervals can be significant.
This guide covers the factors that determine how often brake fluid needs changing: manufacturer specifications by brand, the chemistry behind fluid degradation, and the practical indicators that tell you when replacement is overdue. The goal isn’t to give you a single number that applies to every vehicle. The goal is to help you understand the variables so you can make an informed decision for your specific situation.
Whether you drive a daily commuter, a truck that tows regularly, or a vehicle that sits in the garage more than it drives, the interval that makes sense depends on several measurable factors. By the end of this guide, you’ll know how to check your fluid’s condition, interpret what you find, and determine whether your current maintenance schedule is adequate or needs adjustment.
For those experiencing warning signs already, the section on low brake fluid symptoms covers the diagnostic side in more depth.
Why Brake Fluid Needs Changing
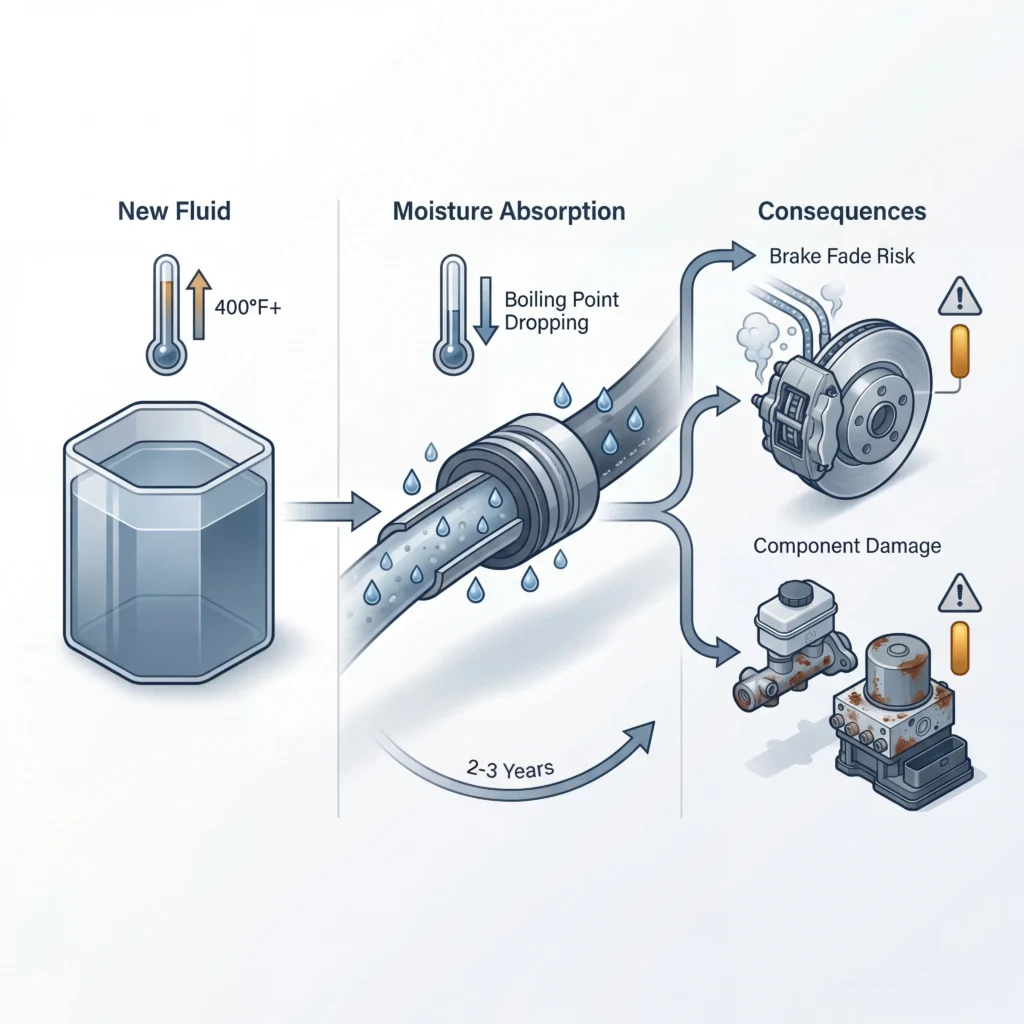
Brake fluid degrades over time even in a sealed system. The short answer is moisture absorption. The longer answer requires understanding the chemistry involved.
What is hygroscopic? Hygroscopic describes a substance that actively absorbs water vapor from the surrounding atmosphere. Most brake fluids (DOT 3, DOT 4, DOT 5.1) are glycol-ether based and hygroscopic by design, pulling moisture into the fluid rather than allowing water to pool separately in brake lines where it would cause localized corrosion.
This hygroscopic property exists for good reason. The fluid pulls moisture into itself rather than allowing water to collect at low points in the brake lines. However, as moisture content increases, two problems develop.
First, the fluid’s boiling point drops. Fresh DOT 3 brake fluid has a dry boiling point around 401°F (205°C) according to federal safety standard FMVSS 116. After absorbing just 3% water by volume, that number can fall below 284°F (140°C). During aggressive braking or sustained downhill driving, temperatures in the caliper can exceed 300°F. If the fluid boils, it creates vapor pockets in the brake lines. Vapor compresses; liquid doesn’t. That’s the mechanism behind a spongy pedal or complete brake fade.
Second, the absorbed moisture accelerates corrosion inside the brake system. The master cylinder, ABS modulator, calipers, and steel brake lines all contain metal components that corrode when exposed to moisture-contaminated fluid over extended periods. Replacing corroded brake lines or a failed ABS unit costs considerably more than routine fluid changes.
The question isn’t whether brake fluid degrades. It does. The question is how quickly it degrades in your specific driving environment and whether your current interval accounts for that rate.
For a deeper look at the degradation process, see does brake fluid go bad.
How Often to Change Brake Fluid by Vehicle Type
The answer depends on a few factors, but manufacturer recommendations provide the most reliable baseline. Here’s what major brands specify:
Manufacturer Brake Fluid Change Intervals
| Manufacturer | Recommended Interval | Notes |
|---|---|---|
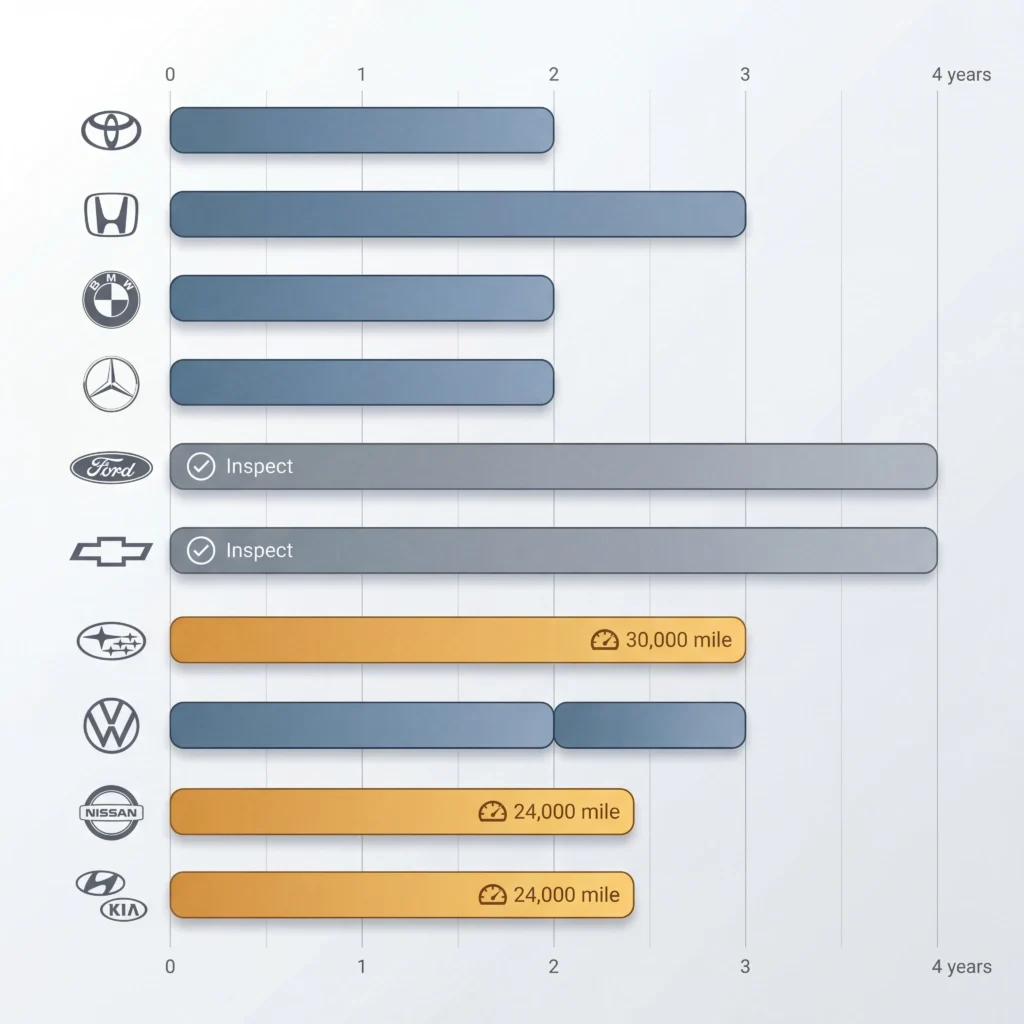
| Toyota | Every 2 years | Regardless of mileage |
| Honda | Every 3 years | Mileage not specified |
| BMW | Every 2 years | Part of annual inspection |
| Mercedes-Benz | Every 2 years | All models |
| Ford | No specific interval | “Inspect as needed” – recommend 2-3 years |
| Chevrolet | No specific interval | Check owner’s manual – recommend 2-3 years |
| Subaru | Every 30,000 miles | Or 30 months |
| Volkswagen | Every 2 years | All models |
| Nissan | No specific interval | Inspect during service – recommend 2-3 years |
| Hyundai/Kia | Every 2 years | Or 24,000 miles |
Source: Based on 2024-2025 owner’s manual specifications. Verify current recommendations for your specific model year.
The distinction matters because a blanket “every two years” recommendation doesn’t account for manufacturers that use longer intervals or those that specify mileage-based service. Ford and Chevrolet, for example, leave the decision to owner judgment, which means many drivers never change their brake fluid until a problem develops.
Pro Tip from Rohan: If your owner’s manual doesn’t specify an interval, default to the two-year mark. I’ve seen fluid from “no recommendation” vehicles test worse than those with strict schedules simply because drivers assumed no change was needed.
If your owner’s manual provides a specific interval, follow it. If it doesn’t, the two to three year guideline represents a reasonable compromise between safety and cost. Vehicles in high-humidity climates or those driven aggressively (towing, mountain roads, track days) benefit from the shorter end of that range.
For those who also want to verify their brake pads are in good condition during maintenance, see how to check brake pads. Worn pads cause the caliper pistons to extend further, which can lower the fluid level in the reservoir and mask underlying issues.
The data suggests that most drivers would benefit from a change interval somewhere between 24 and 36 months. Beyond that, moisture content tends to reach levels where the safety margin becomes questionable. According to the National Highway Traffic Safety Administration, brake system maintenance is one of the most critical aspects of vehicle safety.
Signs Your Brake Fluid Needs Replacing
Several indicators suggest the fluid has degraded beyond acceptable levels. Some are visual; others show up as changes in pedal feel or stopping performance.
Pedal Feel Changes
A brake pedal that feels soft, spongy, or sinks closer to the floor than it used to indicates air or vapor in the brake lines. In practice, this often means the fluid has absorbed enough moisture to affect hydraulic efficiency. The pedal may also feel inconsistent: firm on the first application, then softer on subsequent stops during the same drive.
Visual Appearance
Fresh brake fluid ranges from clear to light amber depending on the formulation. As it ages, the color darkens through a progression that correlates roughly with contamination level. Dark brown or black fluid has been in the system too long and likely contains both moisture and suspended particulates from internal corrosion.
Dashboard Warning Lights
The brake warning light or ABS indicator illuminating can signal low fluid level, which may result from a leak or from pad wear pushing caliper pistons outward. Either situation warrants investigation. The brake fluid symbol guide explains the various dashboard indicators and what each one means.
Extended Stopping Distances
If braking distances have increased noticeably or the vehicle pulls to one side during braking, contaminated fluid may be contributing to uneven brake application. Worth noting: this symptom often has multiple causes, so fluid condition should be verified alongside pad and rotor inspection.
Brake Fade Under Load
Repeated hard braking followed by diminishing pedal response indicates the fluid may be reaching its boiling point. This is particularly common during towing or mountain descents. Fresh fluid with a higher boiling point provides greater thermal margin before fade occurs.
For a comprehensive breakdown of these warning signs, see low brake fluid symptoms.
DOT 3 vs DOT 4 vs DOT 5 Fluid Change Intervals
Before comparing specifications, it helps to understand what the DOT rating system actually measures.
What is a DOT rating? DOT (Department of Transportation) ratings classify brake fluids by their minimum dry and wet boiling points under federal standard FMVSS 116. Higher numbers indicate higher boiling points and generally better performance under demanding conditions. The rating determines minimum performance thresholds, not brand quality.
The numbers tell a clearer story when you compare the specifications directly. There’s a meaningful difference between DOT types that affects both performance and maintenance intervals.
DOT Brake Fluid Comparison
| Property | DOT 3 | DOT 4 | DOT 5 | DOT 5.1 |
|---|---|---|---|---|
| Base Chemistry | Glycol-ether | Glycol-ether | Silicone | Glycol-ether |
| Dry Boiling Point | 401°F (205°C) | 446°F (230°C) | 500°F (260°C) | 500°F (260°C) |
| Wet Boiling Point | 284°F (140°C) | 311°F (155°C) | 356°F (180°C) | 356°F (180°C) |
| Hygroscopic | Yes | Yes | No | Yes |
| Typical Interval | 2-3 years | 2-3 years | 4-5 years | 2 years |
| Compatible With | DOT 3, 4, 5.1 | DOT 3, 4, 5.1 | DOT 5 only | DOT 3, 4, 5.1 |
| Common Applications | Standard vehicles | European cars, performance | Military, classic cars | Racing, high-performance |
Source: Minimum specifications per FMVSS 116. Individual products may exceed these minimums.
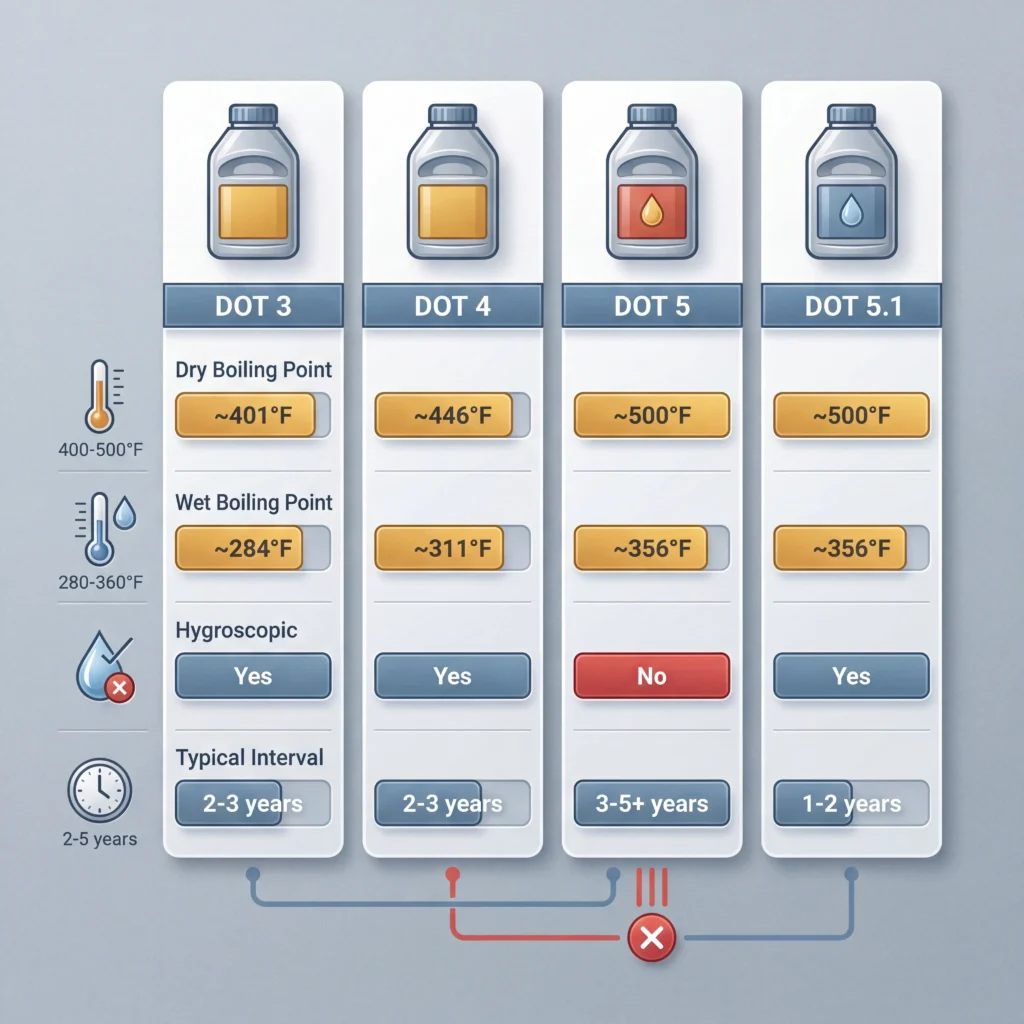
The key distinction: DOT 5 (silicone-based) is not hygroscopic and doesn’t absorb water. This sounds like an advantage, but it creates a different problem. Any moisture that enters a DOT 5 system remains as separate water droplets rather than being absorbed into the fluid. Those droplets can pool at low points in the brake lines, freeze in cold weather, or boil during heavy braking. DOT 5 also has different compressibility characteristics that can affect pedal feel.
For most passenger vehicles, DOT 3 or DOT 4 works well with a two to three year change interval. Vehicles with higher performance demands (track use, towing, mountain driving) benefit from DOT 4 or DOT 5.1 for their higher wet boiling points.
If you’re considering DOT 5, the DOT 5 brake fluid guide covers the specific applications where silicone fluid makes sense and the compatibility issues to avoid.
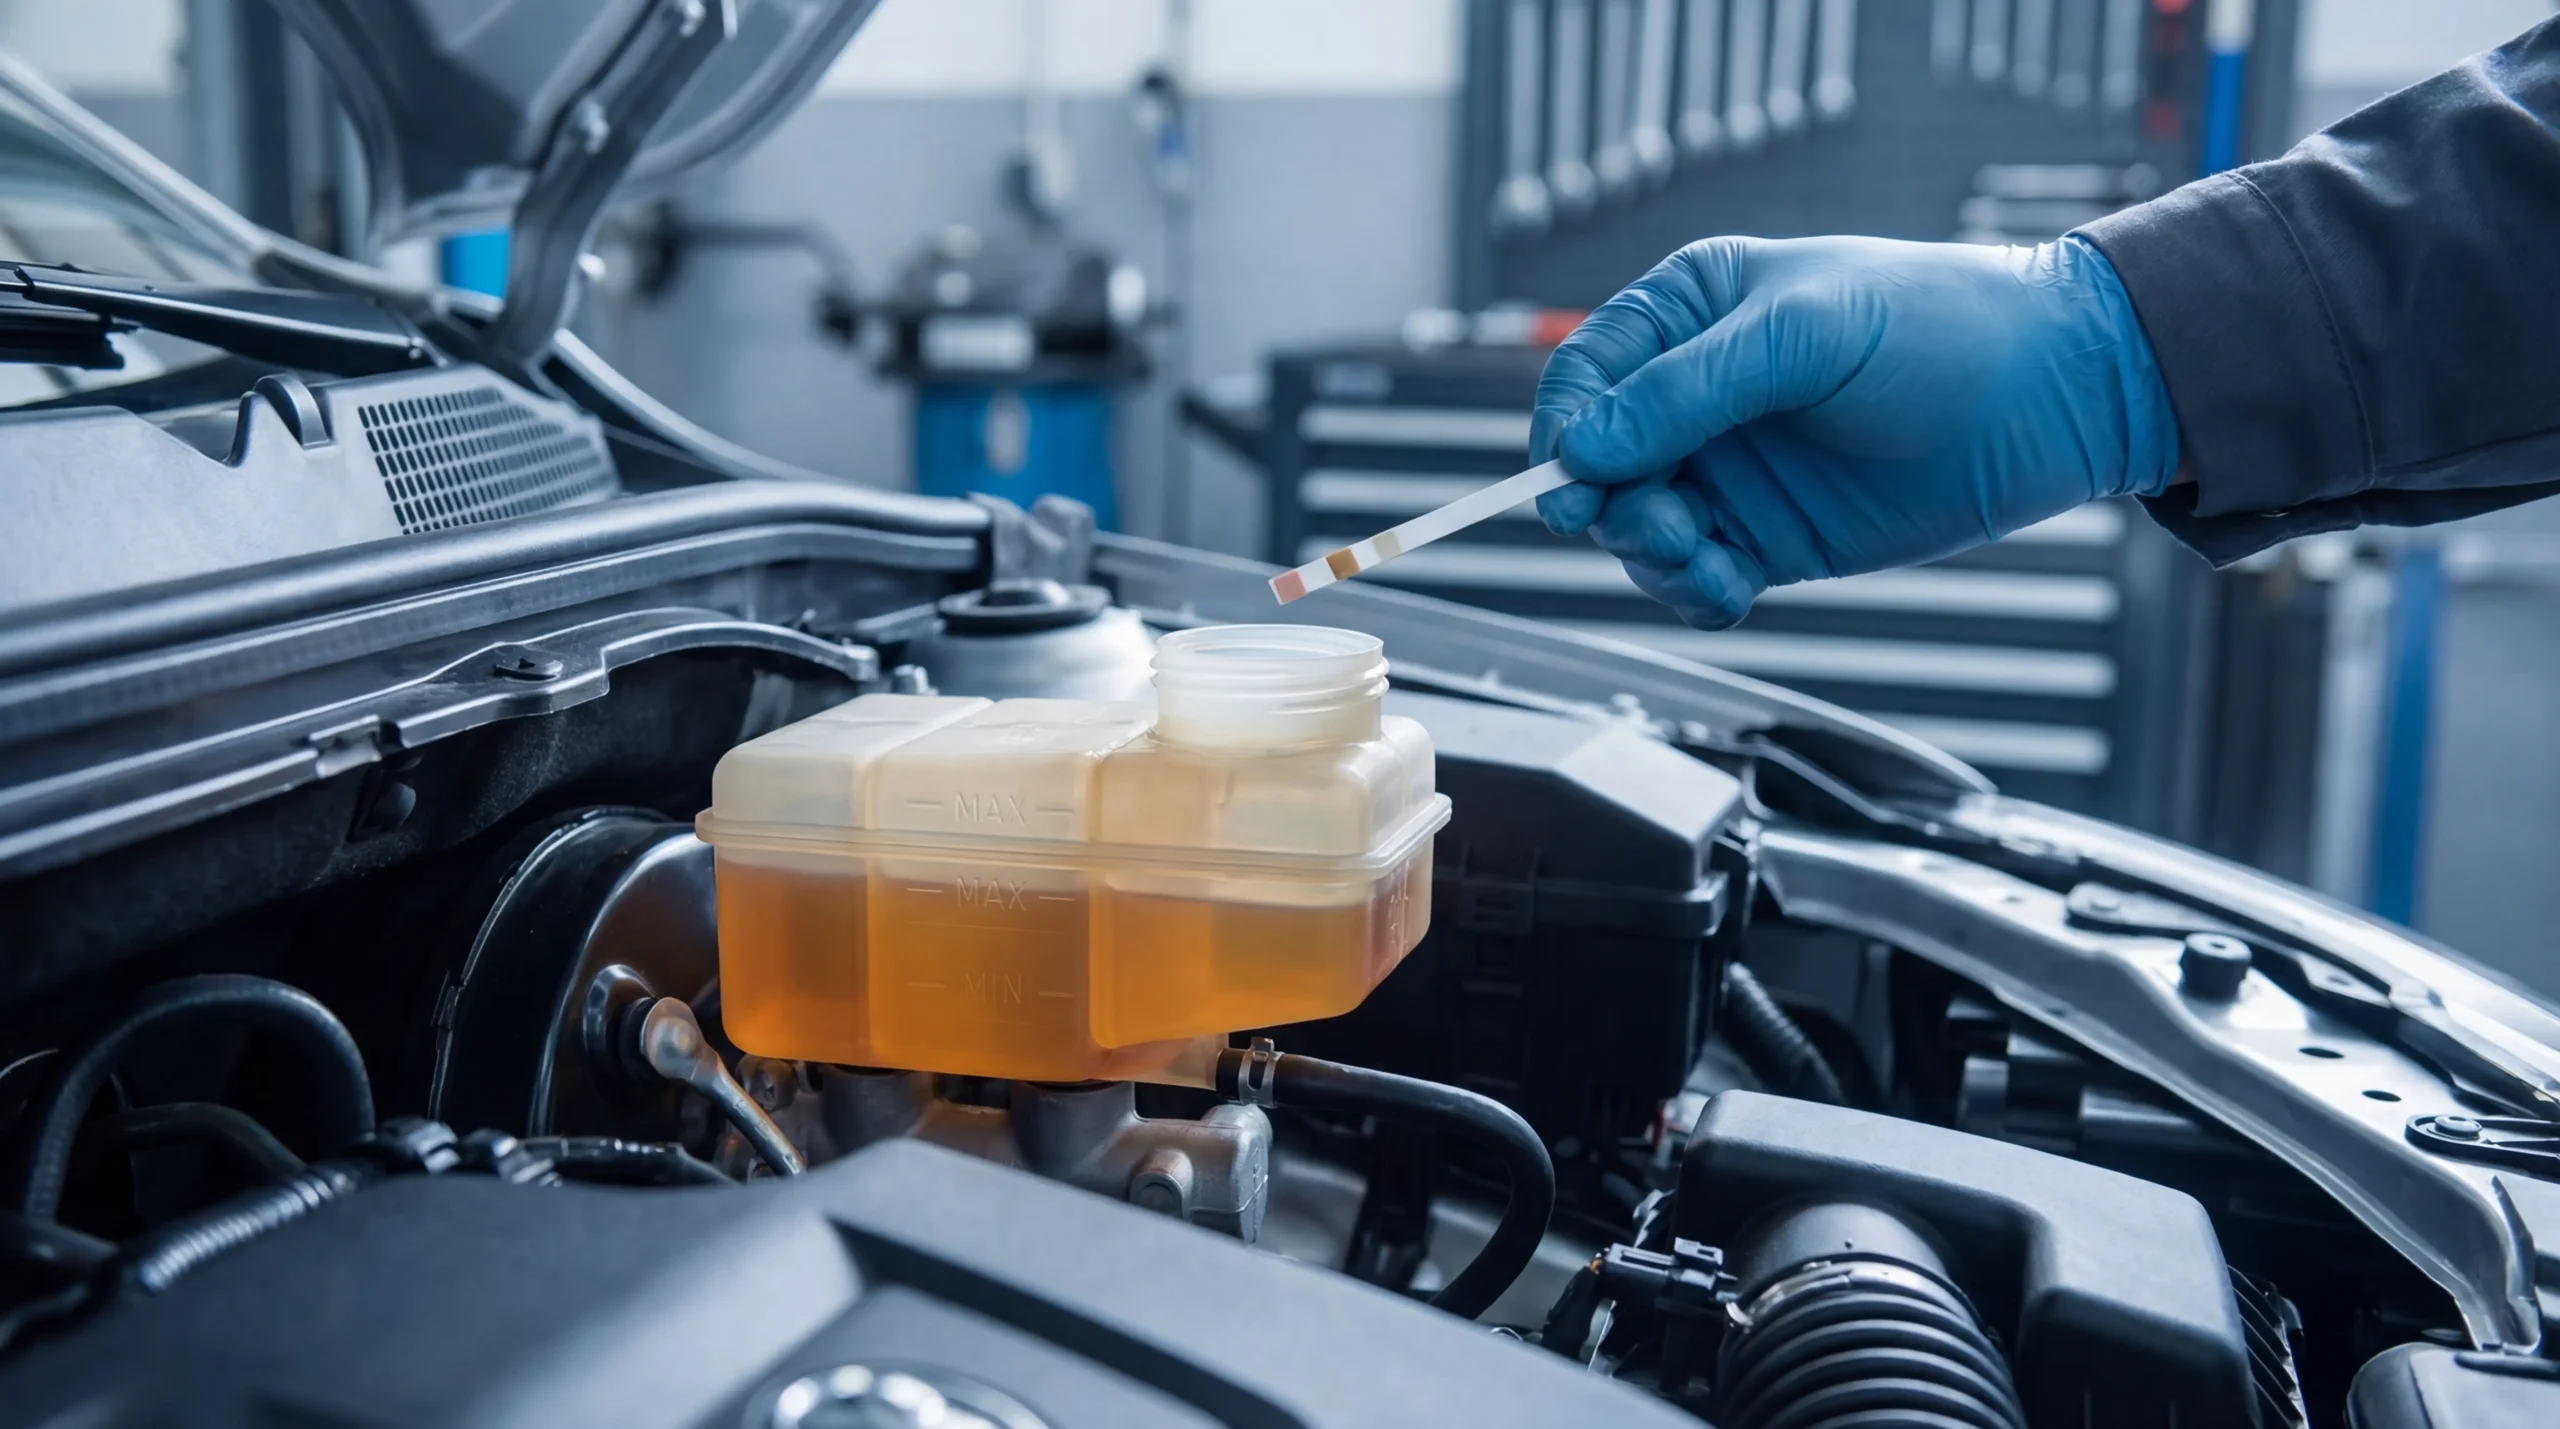
How to Check Brake Fluid Condition
Checking brake fluid takes a few minutes and requires no specialized tools beyond a flashlight and access to the brake fluid reservoir.
Locate the Reservoir
The brake fluid reservoir sits on top of the master cylinder, typically near the firewall on the driver’s side of the engine compartment. Most reservoirs are translucent plastic, allowing you to see the fluid level without removing the cap. Look for min/max markings on the side.
Check the Level
Fluid should fall between the minimum and maximum lines. Level slightly below maximum is normal; level at or below minimum indicates either a leak or significant brake pad wear. Before adding fluid, investigate the cause. Topping off to mask a leak or worn pads delays necessary repairs.
Pro Tip from Rohan: Before opening the reservoir cap, wipe the area clean with a lint-free cloth. Dirt falling into the reservoir during your inspection introduces the very contamination you’re trying to avoid.
Assess the Color
This is where the evaluation becomes more informative than just checking the level.
Fresh brake fluid appears clear to light amber. As moisture and contaminants accumulate, the color darkens progressively. A systematic visual check gives you a rough indicator of fluid condition without specialized testing equipment.
Test for Moisture (Optional)
Brake fluid test strips and electronic testers measure moisture content or copper concentration in the fluid. Test strips cost around five to ten dollars and provide objective moisture readings beyond visual assessment alone. Copper levels rise as internal corrosion progresses, making copper testing a useful secondary indicator. These tools add precision to the visual check but aren’t strictly necessary for most drivers. The color assessment provides adequate guidance for routine maintenance decisions.
What the Results Mean
| Finding | Interpretation | Action |
|---|---|---|
| Clear/amber, level OK | Fluid in good condition | Continue monitoring |
| Light brown, level OK | Some degradation | Schedule change within 6 months |
| Dark brown/black | Significant contamination | Change immediately |
| Level below minimum | Possible leak or worn pads | Investigate before adding fluid |
For detailed guidance on interpreting color changes, see the section below and the dedicated brake fluid color guide.
Brake Fluid Color Chart: Fresh to Contaminated
The visual progression of brake fluid provides a practical diagnostic tool. While color alone doesn’t measure moisture content precisely, it correlates well enough to inform maintenance decisions.
Brake Fluid Color Progression
| Stage | Color | Typical Age | Condition | What I Typically See | Recommendation |
|---|---|---|---|---|---|
| New | Clear to light gold | 0-6 months | Excellent | Almost water-clear with slight yellow tint | No action needed |
| Good | Light amber | 6-18 months | Good | Honey-colored, fully transparent | Monitor at next service |
| Fair | Medium amber/brown | 18-30 months | Acceptable | Starting to look like weak tea | Plan replacement |
| Poor | Dark brown | 30-48 months | Degraded | Coffee-colored, may show slight cloudiness | Replace soon |
| Bad | Black/opaque | 48+ months | Contaminated | Can’t see through it, sometimes gritty | Replace immediately |

The transition from amber to brown happens gradually. In my experience documenting fluid condition across multiple vehicles, the shift from “good” to “fair” often occurs around the 18 to 24 month mark in humid climates, later in dry regions. The rate varies enough by environment that visual checks matter more than calendar intervals alone.
To be fair, color doesn’t tell the complete story. Fluid can appear relatively light while still holding elevated moisture levels. Conversely, some additives in newer fluid formulations produce a darker initial color. The color chart works best as one input alongside age, driving conditions, and any performance changes you’ve noticed.
The brake fluid color guide includes comparison photos and more specific guidance on interpreting what you see.
Climate and Driving Conditions Impact
Environmental factors influence degradation rates more than many maintenance guides acknowledge. A two-year interval that works well in Arizona may be insufficient in Florida.
Humidity Effects
Brake fluid absorbs moisture from the atmosphere through microscopic permeation in brake hoses and seals, as well as through condensation during temperature cycling. High-humidity environments (greater than 60% annual average) accelerate this process. Vehicles in the Southeast, Gulf Coast, and Pacific Northwest typically show higher moisture content at equivalent age compared to those in desert climates.
Driving Pattern Factors
| Condition | Effect on Fluid | Interval Adjustment |
|---|---|---|
| High humidity climate | Faster moisture absorption | Shorten by 6-12 months |
| Dry climate | Slower moisture absorption | Standard interval OK |
| Frequent towing | Higher brake temperatures | Shorten by 6 months |
| Mountain driving | Sustained high temps | Shorten by 6 months |
| Mostly highway | Lower brake stress | Standard interval OK |
| Stop-and-go traffic | Moderate brake stress | Standard interval OK |
| Track days / spirited driving | Extreme temps | Change before events |
| Vehicle sits unused | Moisture still accumulates | Don’t extend past 3 years |
Hybrid and Electric Vehicle Considerations
Vehicles with regenerative braking systems present a different maintenance picture. Hybrids like the Toyota Prius and electric vehicles use regenerative braking for most deceleration, which means the hydraulic brakes engage less frequently. This sounds like it would extend fluid life, but the reduced brake use can actually allow moisture to accumulate without the heat cycling that might otherwise drive some moisture out of the system. Additionally, the ABS actuators in these vehicles perform more sophisticated functions and can be particularly sensitive to contaminated fluid. Toyota has noted issues with Prius and 4Runner ABS units failing prematurely when fluid maintenance is neglected. If you drive a hybrid or EV, the standard two to three year interval still applies; don’t assume regenerative braking means you can skip fluid service.
The variable most people underestimate: vehicles that sit unused. Brake fluid continues absorbing moisture even when the car doesn’t move. A garage queen that drives 2,000 miles per year still needs fluid changes on the same time-based interval as a daily driver.
For vehicles used in demanding conditions, testing fluid moisture content annually provides better guidance than relying solely on time intervals. The copper strip test or electronic testers mentioned earlier help identify when the fluid has reached its practical limit regardless of calendar age.
Routine maintenance also includes checking tire pressure at regular intervals; both brake fluid and tire pressure benefit from time-based inspection schedules.
DIY Brake Fluid Flush Steps
Safety Warning: Brake system maintenance is safety-critical. Improper work can result in brake failure, which may cause serious injury or death. If you are uncomfortable with any step in this procedure, or if your vehicle has a complex ABS system that requires scan tool activation, consult a certified mechanic. The following procedure is based on personal experience and may not apply to all vehicles. Always verify specifications in your vehicle’s owner’s manual before proceeding.
The procedure itself isn’t complicated, but the details matter. A brake fluid flush involves replacing the old fluid entirely, not just topping off the reservoir.
Tools and Materials
You’ll need fresh brake fluid (correct DOT type for your vehicle, typically 32 oz for a complete flush), a brake bleeder wrench or combination wrench (usually 8mm or 10mm), clear tubing to attach to the bleeder valve, a catch container, and a helper to pump the brake pedal. A brake line wrench prevents rounding the bleeder valve; standard open-end wrenches can damage fittings corroded from years of exposure.
Pro Tip from Rohan: Label your brake fluid bottles with the date you opened them. Glycol-based fluid begins absorbing moisture the moment the seal breaks. I won’t use an opened bottle that’s been sitting for more than a few months.
Basic Procedure
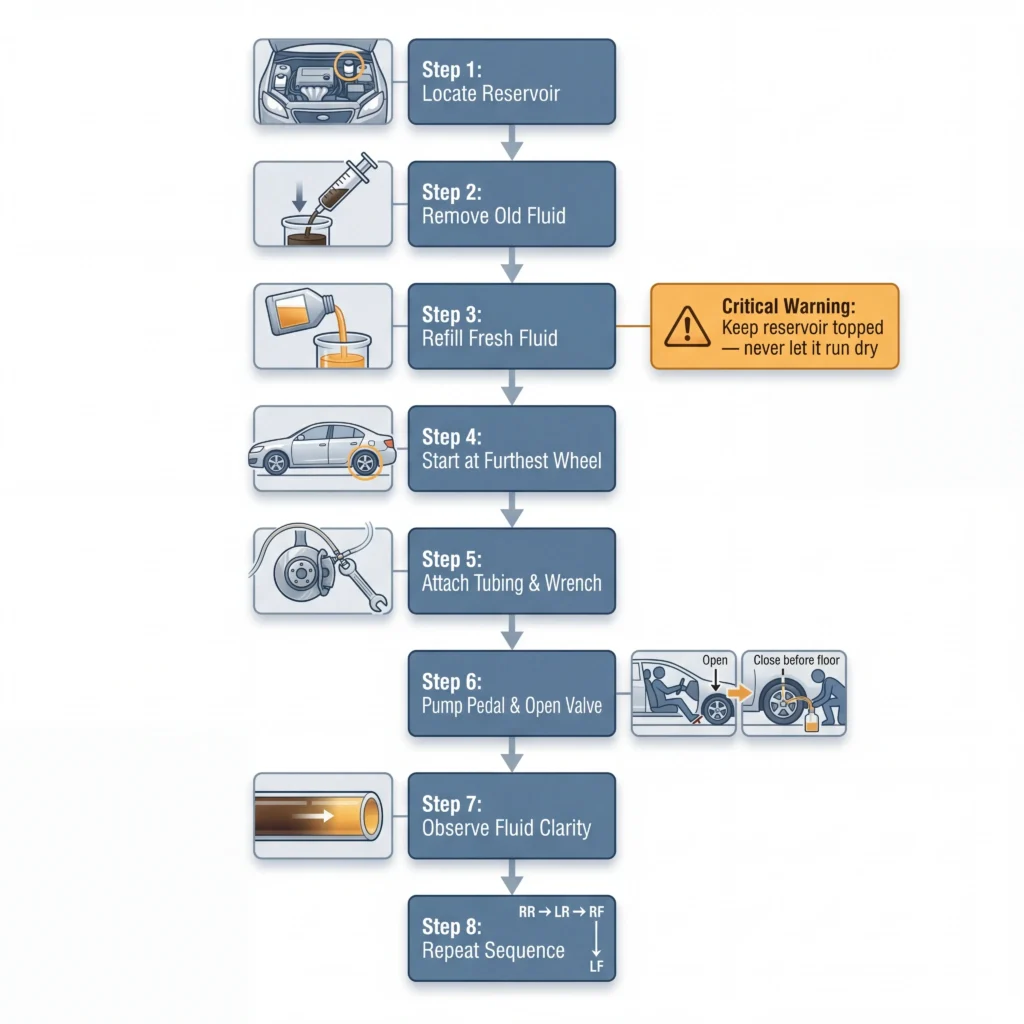
- Locate the brake fluid reservoir and remove the cap. Note the current level.
- Use a turkey baster or syringe to remove as much old fluid as possible from the reservoir. This gets the worst of the contaminated fluid out before pushing new fluid through the lines.
- Refill the reservoir with fresh fluid to the maximum line. Keep it topped off throughout the process.
- Start at the wheel furthest from the master cylinder (typically right rear). Attach clear tubing to the bleeder valve and place the other end in the catch container.
- Have your helper pump the brake pedal several times, then hold it down. Open the bleeder valve slightly; fluid will flow through the tubing. Close the valve before the pedal reaches the floor, then have your helper release and repeat.
- Watch the fluid color in the clear tubing. Continue until you see clean, fresh fluid with no air bubbles.
- Close the bleeder, move to the next wheel following the sequence: right rear, left rear, right front, left front.
- Check reservoir level frequently. Never let it run dry, or you’ll introduce air into the system and create more work.
ABS Vehicles
Vehicles with ABS require additional steps or specialized equipment to cycle the ABS modulator. Some ABS systems can be bled with the manual procedure above; others require a scan tool to activate the pump and valves. Garrett covers the brake component side of this work in his guides on brake system components, and the bleeding brakes on ABS system article addresses the specific procedure variations for ABS-equipped vehicles.
Safety Considerations
Brake fluid is corrosive to painted surfaces and can cause eye irritation. Wipe up spills immediately. Wear safety glasses; fluid contact with eyes requires immediate flushing with clean water. Old fluid should be disposed of properly, not poured down drains. Most auto parts stores accept used brake fluid for proper disposal, and the EPA provides guidance on hazardous waste disposal in your area.
For information on brake fluid’s chemical properties, including flammability, see is brake fluid flammable.
Cost: DIY vs Professional Flush
The cost difference between DIY and professional service is substantial, though the right choice depends on your comfort level and available time. All prices below reflect typical US market rates as of early 2026 and may vary by region.
Cost Comparison (As of Early 2026)
| Service Type | Typical Cost | What’s Included |
|---|---|---|
| DIY | $15-30 | Fluid only; your labor |
| Independent Shop | $80-150 | Fluid, labor, disposal |
| Dealership | $100-200+ | OEM fluid, labor, disposal, inspection |
| Quick Lube | $70-130 | Fluid, labor; quality varies |
Prices current as of early 2026. Actual costs may vary based on location, vehicle type, and shop rates. Verify current pricing before service.
Pro Tip from Rohan: Ask the shop what equipment they use for the flush. Pressure or vacuum bleeders do a more thorough job than the pedal-pump method and are worth a small premium if that’s what they offer.
DIY cost covers one to two quarts of brake fluid at roughly eight to fifteen dollars per quart. If you already own basic tools, there’s no additional investment. The job takes 45 minutes to an hour for someone who’s done it before, longer for a first attempt.
Professional service adds labor and convenience. Shops typically flush the system using pressure or vacuum equipment that works faster than the two-person pedal pump method. Dealerships charge premium rates but use OEM-specified fluid and often include a brake system inspection.
When Professional Service Makes Sense
Complex ABS systems that require scan tool activation, vehicles where you’re unsure of the bleeder valve condition (corroded valves can break off and create bigger problems), situations where you don’t have a helper, or if you simply prefer not to work on safety-critical systems yourself.
When DIY Makes Sense
Standard vehicles without complex ABS, if you already change your own brake pads and are comfortable with the system, or if cost is a primary consideration and you have the time.
For detailed pricing data by region and shop type, the brake fluid cost guide provides more granular breakdowns.
Explore Brake Fluid Maintenance In-Depth
The interval question is just one piece of brake fluid maintenance. I’ve documented procedures and specifications across these related topics, each addressing a specific aspect of keeping your brake hydraulic system in good working order.
Understanding Your Fluid
- Brake Fluid Color – Visual guide to what each shade means for fluid condition. The color progression from clear to black tells you more than most drivers realize.
- DOT 5 Brake Fluid – When silicone fluid makes sense and why mixing it with glycol-based fluids creates problems. Not as straightforward as it sounds.
- Does Brake Fluid Go Bad – The chemistry behind degradation and shelf life for both unopened containers and fluid in your vehicle.
- Is Brake Fluid Flammable – Flash points by DOT type and safe handling practices during maintenance.
Recognizing Problems
- Low Brake Fluid Symptoms – Warning signs from pedal feel to dashboard lights, with diagnostic steps.
- Brake Fluid Symbol – Identifying brake warning indicators on your dashboard and reservoir cap.
- Brake Fluid Cost – What to budget for DIY versus shop service, including regional price variations.
Brake Line Maintenance
- Brake Line Repair Kit – Contents and usage for DIY line replacement. The spec sheet alone won’t tell you which flare type your vehicle needs.
- Brake Line Fittings – Inverted flare, compression, metric, and SAE types explained with sizing charts.
- Brake Line Wrench – Why flare nut wrenches prevent the rounded fittings that create bigger problems.
- Bleeding Brakes on ABS System – Procedure differences for vehicles with ABS modulators.
What I’ve Learned – Rohan Pettis’s Take
“The question about brake fluid intervals kept nagging me because the answers I found online varied so widely. After documenting fluid condition across my own vehicles and comparing notes with what others reported, the pattern became clearer: manufacturer recommendations exist for good reasons, but they’re calibrated for average conditions. The variables that move the needle most are humidity and how the vehicle gets used.
I stripped the threads on a caliper bracket bolt early on because I torqued it by feel instead of by specification. That mistake cost me an extra $45 for the replacement bracket and two hours of rework in my driveway. That lesson extended to fluid maintenance: measure what you can, document what you find, and let the data inform your intervals rather than guessing. The two to three year guideline works for most situations. But if you’re checking your fluid color annually and tracking what you see, you’ll know when your specific situation calls for something different.”
— Rohan Pettis, Brake Maintenance Writer
Common Brake Fluid Mistakes (And How to Avoid Them)
Mistake #1: Never Checking Fluid Condition
Many drivers top off fluid without looking at its color or age. The level can be fine while the fluid itself has degraded beyond its effective service life. The fix: pop the reservoir cap and look at the fluid during every oil change. Takes 30 seconds.
Mistake #2: Topping Off Instead of Flushing
Adding fresh fluid to contaminated fluid dilutes the problem rather than solving it. The old fluid still contains moisture that lowers the overall boiling point. The fix: when fluid is due for service, flush the entire system rather than just adding to the reservoir.
Mistake #3: Using the Wrong DOT Type
Mixing DOT 5 (silicone) with DOT 3/4/5.1 (glycol) causes compatibility issues that can swell seals and cause brake system damage, potentially leading to brake failure. The fix: check your owner’s manual or the cap of the master cylinder reservoir. Use only the specified DOT type.
Mistake #4: Letting the Reservoir Run Dry During Bleeding
Introducing air into the brake lines creates more work and can leave you with a spongy pedal. The fix: keep the reservoir topped off throughout the flush procedure. Check the level after every two or three pumps of the pedal.
Mistake #5: Ignoring the Service Interval for Low-Mileage Vehicles
Time-based degradation happens regardless of miles driven. A vehicle that drives 3,000 miles per year still absorbs moisture at roughly the same rate as one that drives 15,000. The fix: follow the time-based interval (two to three years) even if mileage-based triggers haven’t been reached.
Frequently Asked Questions
What happens if I don’t change brake fluid?
Moisture accumulation lowers the fluid’s boiling point over time, increasing the risk of brake fade during demanding stops. The moisture also accelerates internal corrosion, potentially damaging the master cylinder, ABS modulator, calipers, and brake lines. Worst case: complete brake failure from a corroded line or vapor lock during aggressive braking. Best case: you get away with neglect for a while, then face a more expensive repair when a component fails. The National Highway Traffic Safety Administration considers brake system maintenance critical for vehicle safety.
Can brake fluid last 10 years?
Technically, the fluid will still be in the reservoir after 10 years. Functionally, it has almost certainly absorbed enough moisture to compromise braking performance and promote internal corrosion. Most manufacturers recommend two to three year intervals for good reason. Fluid that has sat for a decade should be replaced before driving the vehicle under any conditions that require confident braking.
Is a brake fluid flush necessary?
Yes, for vehicles driven regularly in normal conditions. The fluid’s hygroscopic properties mean moisture absorption is continuous and inevitable. A flush removes degraded fluid and replaces it with fresh fluid that has full thermal capacity. The alternative is waiting until symptoms develop, which typically means the degradation has progressed far enough to affect braking performance or damage components.
Is it really necessary to change brake fluid every 2 years?
The two-year interval represents a conservative guideline that provides adequate safety margin for most driving conditions. Some vehicles in dry climates with light use may go longer without measurable problems. Others in humid environments or with demanding use patterns benefit from shorter intervals. If you want to extend beyond two years, testing the fluid’s moisture content provides objective data to inform that decision rather than relying on hope.
How do I know if my brake fluid is bad?
Check the color: dark brown or black indicates significant contamination. Check the pedal feel: soft, spongy, or inconsistent response suggests air or vapor in the lines. Check for warning lights: the brake symbol or ABS indicator may illuminate when fluid level drops or system pressure becomes inconsistent. Any of these signs warrant inspection and likely fluid replacement.
Can I just top off brake fluid instead of flushing?
Topping off addresses low level but doesn’t address contamination. If fluid has been in the system for several years, adding fresh fluid to degraded fluid provides marginal improvement at best. A full flush removes the moisture-laden fluid from the lines and calipers, not just the reservoir.
What’s the difference between a brake fluid change and a flush?
A change typically refers to replacing the fluid in the reservoir. A flush involves pushing new fluid through the entire system until the old fluid is completely expelled from the brake lines and calipers at all four wheels. The flush is more thorough and more effective at removing degraded fluid.
Does the brand of brake fluid matter?
The DOT rating matters more than the brand. Any fluid meeting DOT 3, DOT 4, or DOT 5.1 specifications (depending on what your vehicle requires) will perform adequately. Higher-tier brands may offer slightly better boiling points or additive packages, but the performance difference is marginal for street driving. Match the DOT spec and you’ll be fine.
Your Maintenance Baseline
The data points toward a clear recommendation: change brake fluid every two to three years for most vehicles, or follow your manufacturer’s specific interval if one is documented. Check the fluid’s color annually; what you see tells you whether your current interval fits your driving conditions.
Before your next drive, consider these three priorities:
- Check your owner’s manual for manufacturer recommendations specific to your vehicle make and model.
- Open the reservoir and assess fluid color now. If it’s dark brown or black, schedule a flush regardless of when the last one occurred.
- Document what you find. That record becomes your baseline for tracking degradation rate in your specific environment.
The procedure isn’t complicated for DIY; the cost is minimal for professional service. Either way, the investment in fresh fluid protects the more expensive components it flows through.
For the foundational understanding of brake pad maintenance that pairs with fluid service, start with how to check brake pads. Both inspections can happen during the same maintenance session.
Document what you find. It becomes your own baseline.
— Rohan Pettis
About the Author
Rohan Pettis — Brake Maintenance Writer
Rohan Pettis writes about brake pads, brake fluid, and rotor maintenance for BrakeAndTire. His approach to car maintenance comes from a background in quality assurance and a habit of documenting everything. What started as a single DIY brake fluid flush to avoid an overpriced shop bill turned into an ongoing practice of researching procedures, cross-referencing specifications, and performing the work himself. Over the years, he has built a personal reference library of brake maintenance data drawn from hands-on experience across several vehicles. Rohan’s writing focuses on measurements, intervals, and the technical details that most guides skip over. He writes for readers who want more than “check your brakes regularly” and prefer to understand the why behind each recommendation. His guides cover brake pad replacements, fluid flushes, rotor resurfaces, and caliper rebuilds based on personal testing and documentation.