
Think you need a whole new caliper because yours is leaking or sticking? You probably don’t.
A brake caliper rebuild kit costs $15 to $40 for most passenger vehicles. A new caliper runs $60 to $150 or more. The kit contains the seals, dust boots, and sometimes pistons needed to restore a caliper that’s mechanically sound but has worn rubber components. For a caliper with a clean bore and no physical damage, rebuilding makes sense. For one with a scored piston bore or cracked housing, replacement is the only fix.
This guide covers what’s actually in these kits, how to decide between rebuilding and replacing, and the step-by-step process to get it done right. If you’re working on your vehicle’s brake system, a caliper rebuild is one of the more straightforward jobs you can tackle at home.
Safety Note: Brake systems are safety-critical. A failed brake can cause injury or death. This guide assumes familiarity with basic brake work. If you’ve never done brake maintenance, start with pad replacement before attempting a caliper rebuild. If you’re uncertain at any step, consult a qualified mechanic. Always work on a level surface with the vehicle properly supported, use appropriate safety equipment, and never drive a vehicle with an incomplete brake job.
Prices and product availability mentioned reflect typical ranges at the time of writing (March 2026) and may vary by vehicle, region, and retailer. Results depend on proper technique, quality of parts, and your specific vehicle condition.
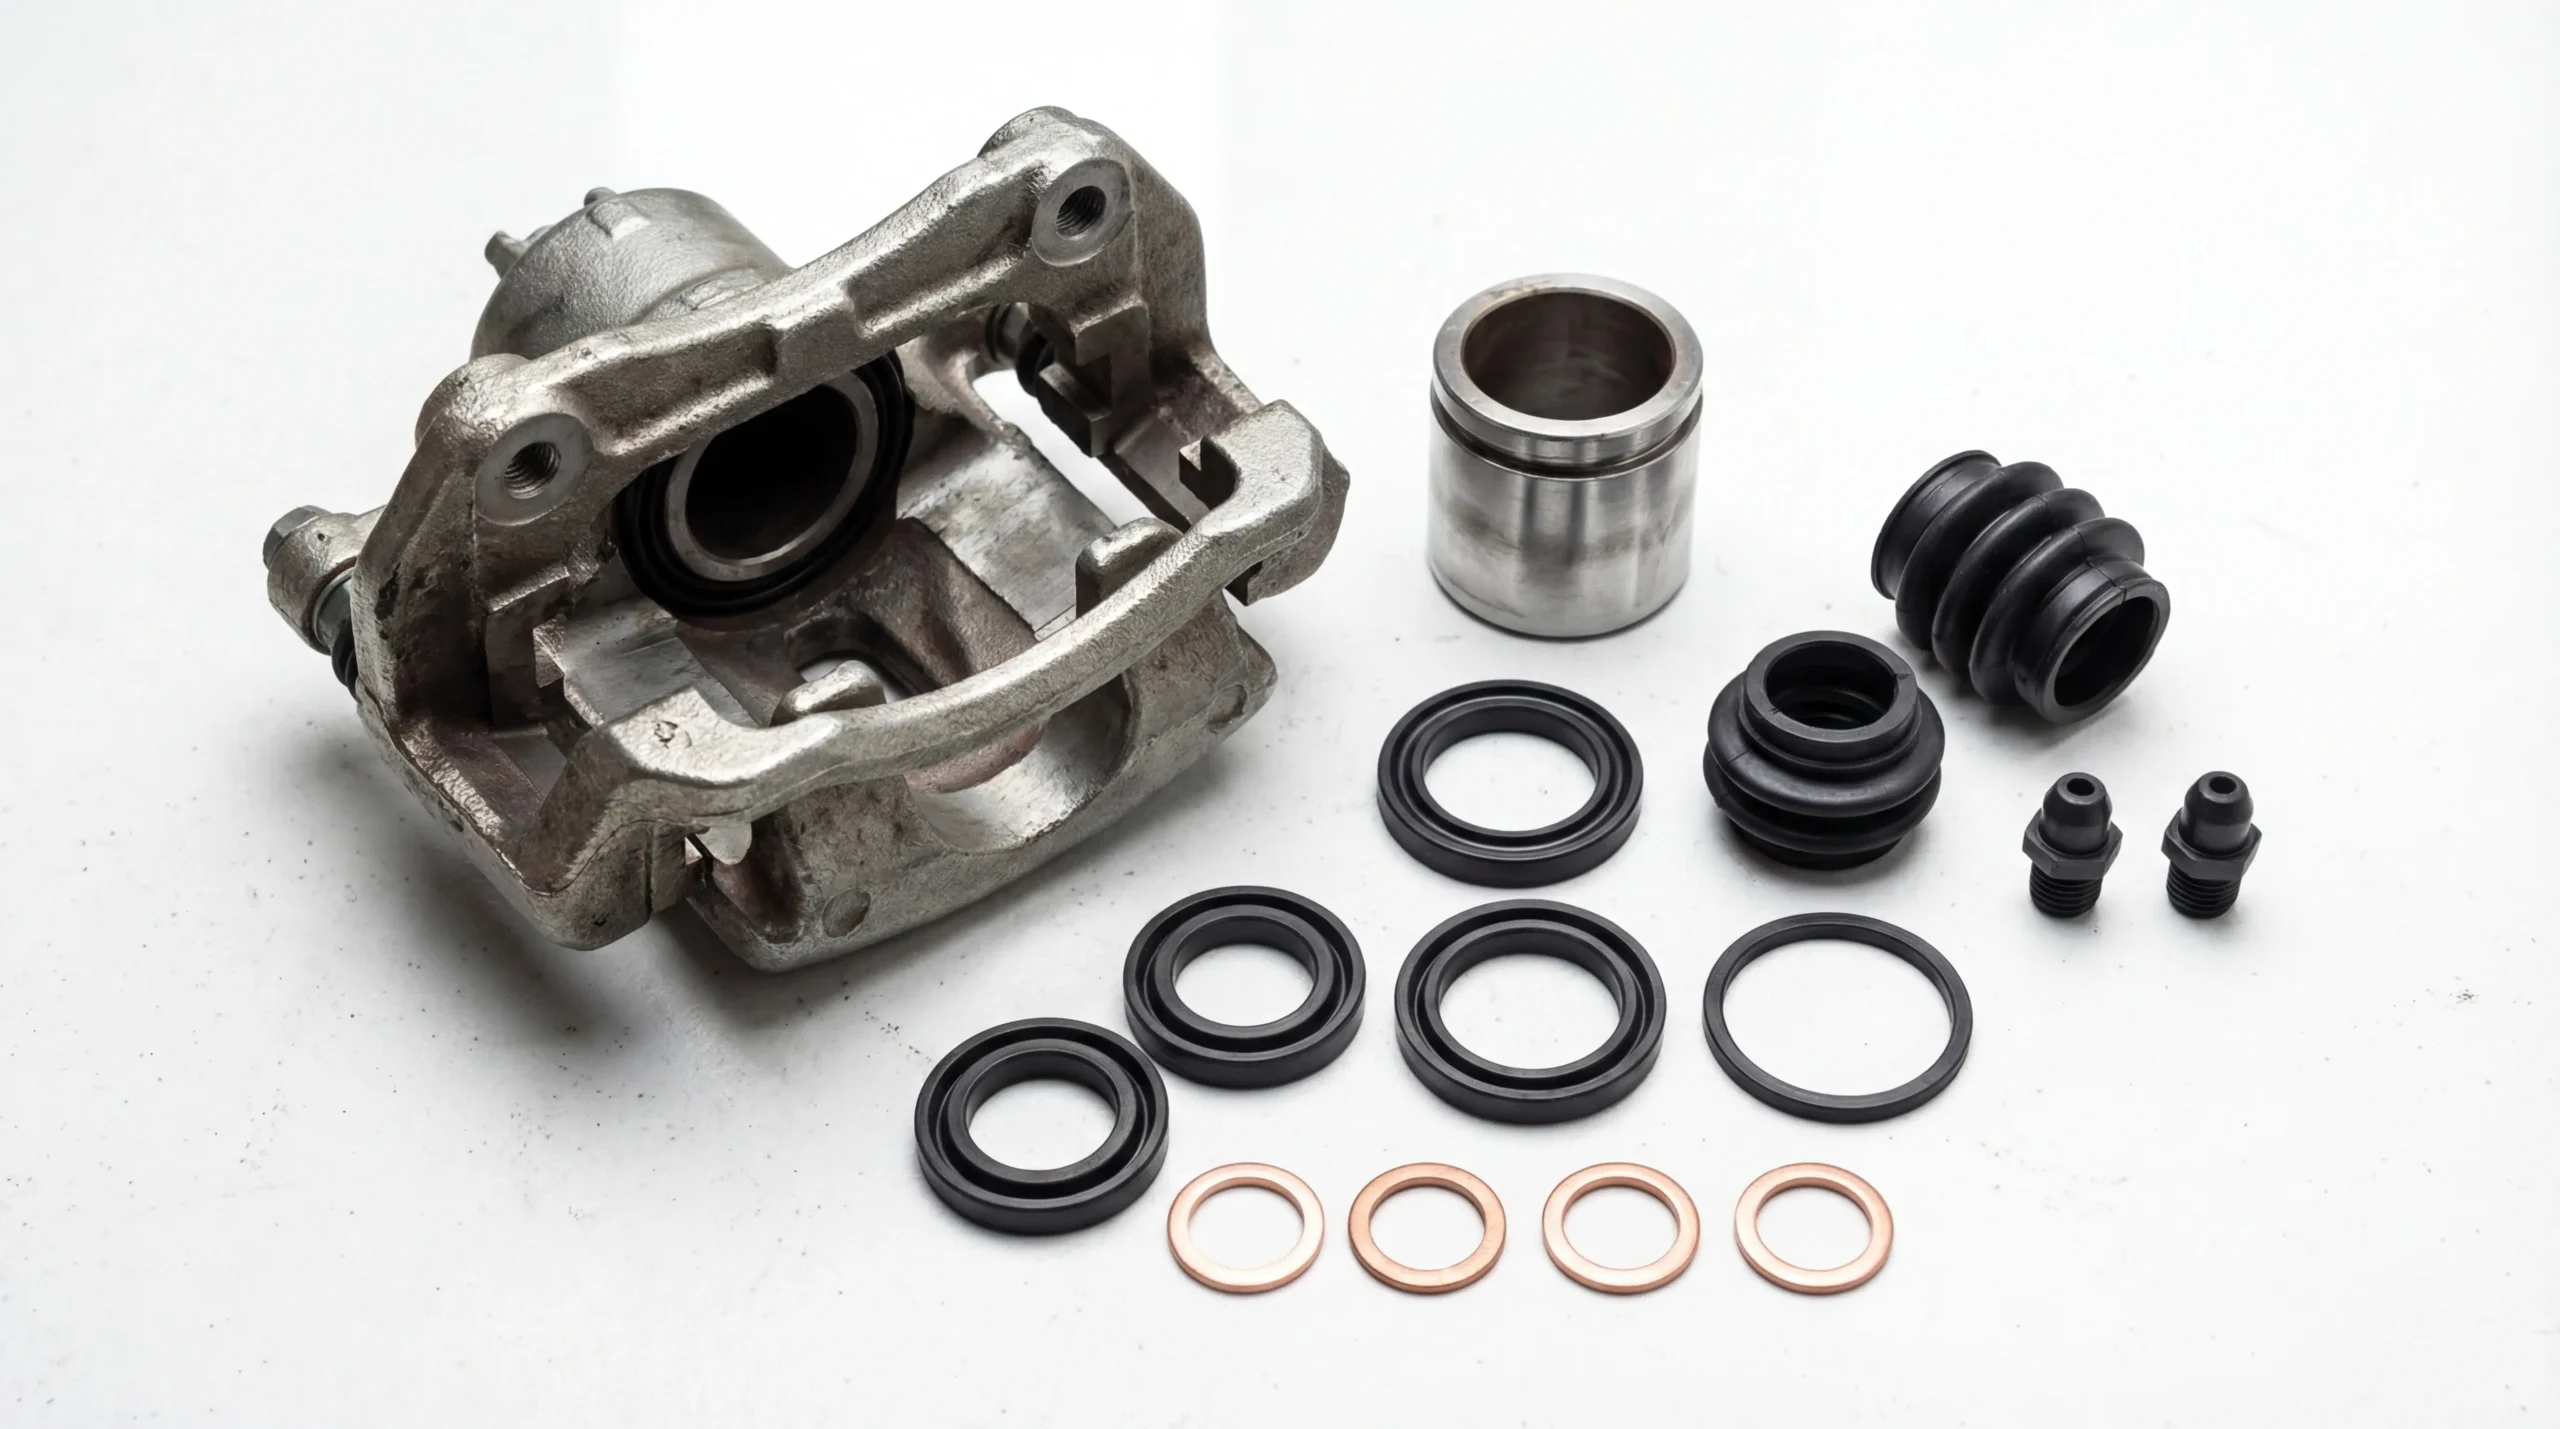
What Comes in a Brake Caliper Rebuild Kit (With or Without Piston)
A standard rebuild kit contains the rubber components that fail over time: the piston seal (also called the square-cut seal), dust boot, bleeder cap, and sometimes guide pin boots. Higher-end kits include the caliper piston itself.
The Piston Seal
The piston seal sits inside the caliper bore. It does two things: prevents brake fluid from leaking past the piston and retracts the piston slightly when you release the brake pedal. That retraction happens because the seal deforms under pressure, then snaps back. When this seal hardens or cracks, you get either a fluid leak or a caliper that doesn’t release properly.
The Dust Boot
The dust boot covers the exposed end of the piston. Road grime, salt, and water attack this area constantly. A torn boot lets contamination into the bore, which accelerates corrosion and eventually seizes the piston.
Piston Materials: Phenolic vs Steel
Kits that include pistons come in two varieties. Phenolic (plastic composite) pistons resist heat transfer better, keeping brake fluid cooler. Steel pistons handle higher loads and last longer under aggressive use. Most passenger vehicles use phenolic. Performance and heavy-duty applications often spec steel. Check your service manual before ordering.
Some kits include copper washers for the banjo bolt (if your caliper uses one) and new bleeder screw caps. Premium kits from manufacturers like Raybestos or Dorman often include silicone-based caliper grease packets. Products like Permatex Brake Lube or Sil-Glyde work well if your kit doesn’t include grease.
Here’s the part nobody mentions: not all kits are created equal. Cheap kits use lower-grade rubber that hardens faster, especially in high-heat applications. I’ve seen budget seals crack within 18 months on a daily-driven Honda Civic. If you’re rebuilding calipers on a vehicle you plan to keep, spend the extra $10 on a quality kit. The OEM spec exists for a reason.
Related: Understanding your brake caliper bracket helps during disassembly.
Rebuild vs Replace: Which Is Better
The decision comes down to the condition of the caliper housing and bore. After rebuilding more calipers than I can count over the years, I’ve developed a simple three-question test.
The 3-Question Caliper Assessment
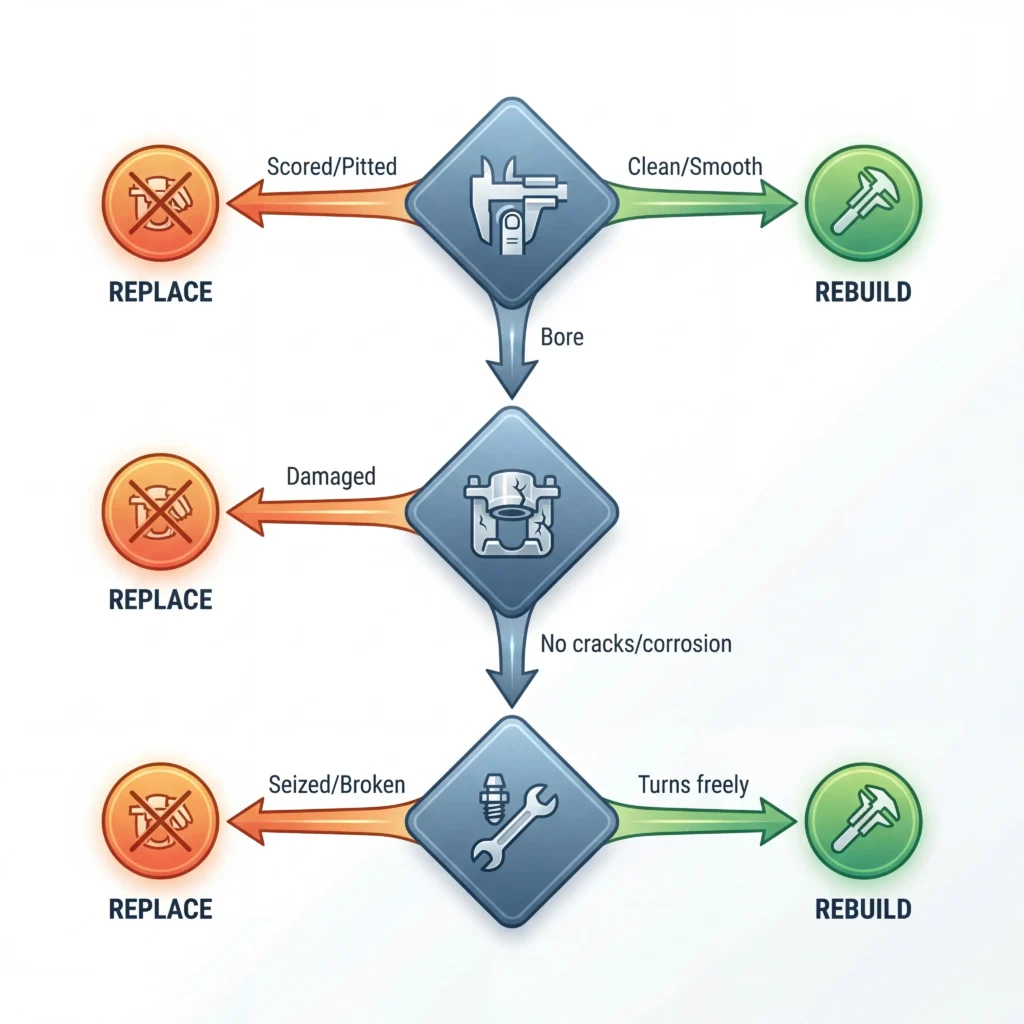
Question 1: Is the bore clean? Run your finger around the inside of the piston bore. Any roughness, scoring, or pitting that you can feel with your fingernail means replacement. A slightly glazed surface can be cleaned. Actual metal damage cannot.
Question 2: Is the housing intact? Look for cracks around the bleeder port and mounting ears. Check for deep external corrosion that’s compromised wall thickness. Any structural damage means replacement.
Question 3: Will the bleeder screw come out? A seized bleeder that snaps off during removal turns a rebuild into a replacement job instantly. Apply penetrating oil a day before you start and see if it loosens. If it doesn’t budge, factor that into your decision.
When to Rebuild
Rebuild when the caliper body has no cracks or deep corrosion, the piston bore is smooth with no scoring or pitting, the bleeder screw isn’t seized or snapped, and you have time and want to save money. Ford F-150 calipers from 2009-2014 are particularly good candidates. They’re expensive new, commonly available as cores, and usually have clean bores because the dust boots hold up well.
When to Replace
Replace when the piston bore shows visible scoring or rust pitting, the caliper body is cracked or severely corroded, the bleeder screw is seized and breaks during removal, the slide pins or mounting ears are damaged, or you need the car back on the road quickly.
Cost Comparison
A rebuild kit runs $15 to $40. A remanufactured caliper costs $60 to $100. A new OEM caliper can exceed $150. Labor at a shop typically runs $75 to $150 per caliper for either option.
For older vehicles where new calipers are expensive or unavailable, rebuilding is often the only practical choice. For common vehicles where remanufactured calipers cost under $50 from the parts store with a core exchange, the time savings of a bolt-on replacement might outweigh the cost difference.
I’ve rebuilt calipers that lasted another 100,000 miles. I’ve also seen rebuilds fail within a year because the bore had damage that wasn’t obvious during inspection. I’ve seen people skip the bore inspection because they “know” it’s fine. They usually call back within six months. Check the bore carefully before committing to a rebuild.
Step-by-Step Caliper Rebuild Guide
This process applies to most single-piston floating calipers. Dual-piston and fixed calipers follow similar principles but require more care.
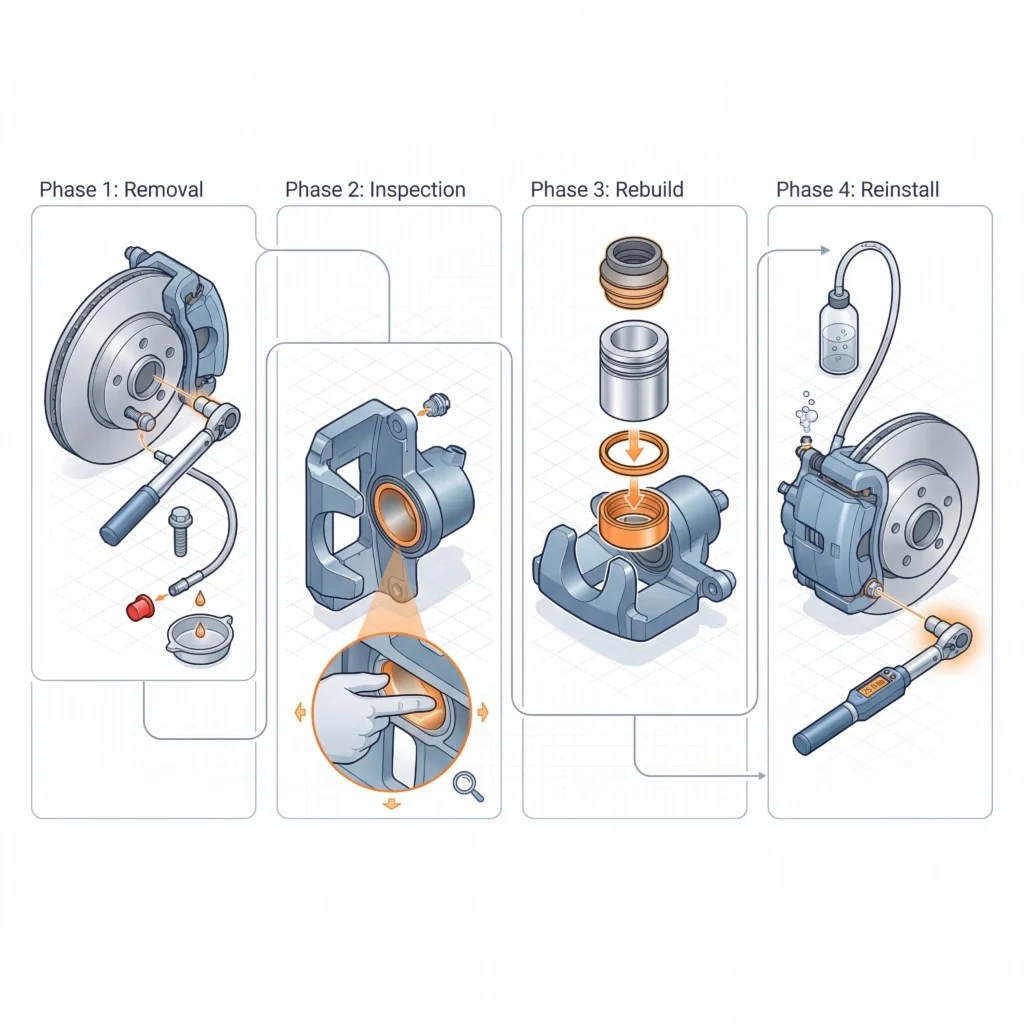
Phase 1: Removal
Step 1. Remove the caliper from the vehicle. Disconnect the brake line and cap it to prevent fluid loss. Have a drain pan ready.
Step 2. Remove the old piston. Use compressed air applied to the fluid inlet port. Keep your fingers clear: the piston can come out with force. Place a block of wood in the caliper opening to catch it.
Phase 2: Inspection and Cleaning
Step 3. Remove the old seals. Pull out the square-cut seal from the groove in the bore using a plastic pick. Metal tools can scratch the bore surface.
Step 4. Inspect the bore. This is the critical step. Run your finger around the inside. Any roughness, scoring, or pitting means the caliper needs replacement, not rebuilding. A slightly glazed surface can be cleaned. Actual metal damage cannot.
Step 5. Clean everything. Use brake cleaner and a lint-free cloth. Remove all old fluid, debris, and residue from the bore and piston.
Phase 3: Rebuild
Step 6. Install the new seal. Lubricate it with clean brake fluid (never petroleum-based grease). Press it into the groove evenly. The seal has a specific orientation. Installing it twisted or pinched causes immediate leaks.
Step 7. Install the new piston. Coat it with brake fluid. Press it straight into the bore by hand. It should slide in smoothly. If it binds, stop and check alignment.
Step 8. Install the new dust boot. Make sure it seats in both the caliper groove and the piston groove. A poorly seated boot will fail quickly.
Phase 4: Reinstallation
Step 9. Reinstall the caliper. Torque the mounting bolts to spec. Most passenger vehicles call for 25-35 ft-lbs on bracket bolts, but check your service manual for the exact figure. Reconnect the brake line.
Step 10. Bleed the brakes. As Rohan covers in his guide on bleeding brakes, air in the lines after any hydraulic work must be purged completely.
Pro Tip from Garrett: Work on one caliper at a time. This way you have the other side as a reference for how things go back together.
Tools You Need for a Caliper Rebuild
The job requires more than basic hand tools.
Essential Tools
You’ll need a brake caliper piston tool or C-clamp for piston removal and installation, a compressed air source with blow gun attachment, plastic or wooden picks for seal removal without scratching, a torque wrench for proper bolt torque on reinstallation, a brake bleeder wrench or line wrench to prevent rounding the bleeder screw, a drain pan and brake cleaner, lint-free cloths, and safety glasses because brake fluid is corrosive to eyes.
Helpful Additions
A brake hone helps if the bore has light glazing. A caliper piston press tool makes stuck pistons easier to manage. A brake fluid catch bottle with one-way valve simplifies bleeding.
The torque wrench matters more than people realize. Overtorquing caliper bracket bolts is one of the most common mistakes, and it can crack the mounting ears or strip threads. Most bracket bolts spec between 25-35 ft-lbs. Banjo bolts typically call for 20-25 ft-lbs. The torque specifications for brake caliper work vary by vehicle.
Pro Tip from Garrett: Skip this step and you’ll know it. Proper bolt torque prevents both loose calipers (dangerous) and damaged threads (expensive). I stripped a caliper bolt thread early in my career by eyeballing the torque. Cost me two hours and a helicoil kit. Get the wrench.
Common Mistakes During Caliper Rebuilds
This is where corners get cut. The #1 mistake I see is skipping the bore inspection. It accounts for probably 80% of the rebuild failures I’ve witnessed.
Using Petroleum-Based Grease on Seals
Brake seals are designed for brake fluid compatibility. Petroleum products cause them to swell and fail. Use only silicone-based caliper grease or clean brake fluid for lubrication. Permatex and Sil-Glyde are safe. WD-40 and axle grease are not.
Reusing Old Hardware
The copper washers on banjo bolts crush to create a seal. They’re single-use. Reusing them invites leaks. A new washer costs less than a dollar. A brake fluid leak on your driveway costs your time and your trust in the repair.
Ignoring Bore Damage
A tiny bit of surface rust might clean up with a brake hone. Actual pitting or scoring will tear your new seals within months. If you can feel it with your fingernail, the caliper needs replacement. No exceptions.
Dry Assembly
Installing the piston or seals without lubrication damages them immediately. Everything gets coated in clean brake fluid before it goes in. Dry rubber drags, bunches, and tears.
Skipping the Bleed
Any time you open the hydraulic system, air gets in. Air compresses. Fluid doesn’t. Skipping the bleed means a soft pedal at best, brake failure at worst.
Wrong Seal Orientation
The square-cut seal has a specific way it sits in the groove. Installing it twisted or pinched causes immediate leaks.
I’ve seen this fail in the shop more than once: a caliper that worked fine on the bench leaked immediately under pressure because the seal wasn’t seated properly. Pressure testing on the bench means nothing if assembly technique is sloppy.
Signs Your Brake Caliper Needs Rebuilding
Several symptoms point to caliper problems. Catching them early means a rebuild works. Ignoring them until the piston seizes means replacement.
Brake Fluid Leak at the Caliper
Dampness or visible fluid around the dust boot or bleeder screw indicates seal failure. This is the most common sign and the easiest to spot during routine inspections.
Vehicle Pulls to One Side During Braking
A sticking caliper applies uneven pressure. This can also come from a collapsed brake hose, so check both. If the hose looks fine and the pull is consistent, the caliper is your likely culprit.
Uneven Pad Wear
If the inner pad wears faster than the outer (or vice versa), the caliper isn’t floating properly or the piston isn’t retracting. This often shows up on vehicles driven primarily in stop-and-go traffic.
Dragging Brakes
A caliper that doesn’t release creates constant friction. You’ll notice the wheel is hot after driving, even without heavy braking. Jack up the wheel and spin it by hand. It should rotate freely with minimal drag.
Spongy Pedal After Pad Replacement
If you’ve bled the system and the pedal still feels soft, a leaking caliper seal may be allowing internal bypass.
A seized rear caliper has additional complications because of the integrated parking brake mechanism.
A Note on Electric and Hybrid Vehicles
The reality is that EV and hybrid caliper issues are becoming more common, not less. Regenerative braking means the friction brakes see less use, which sounds good until you realize the calipers can seize from sitting. I’ve seen 3-year-old EVs with stuck pistons because the brakes went months without full engagement. If you’re working on a hybrid or EV, exercise the calipers by disabling regen and doing a few hard stops before assuming they’re fine. The seals still age even when the piston doesn’t move.
How Much Does a Caliper Rebuild Cost
The parts cost is minimal. What matters is whether your time pencils out against shop labor. I’ve run these numbers on three different vehicles over the years: the math consistently favors DIY if you’re comfortable with the work.
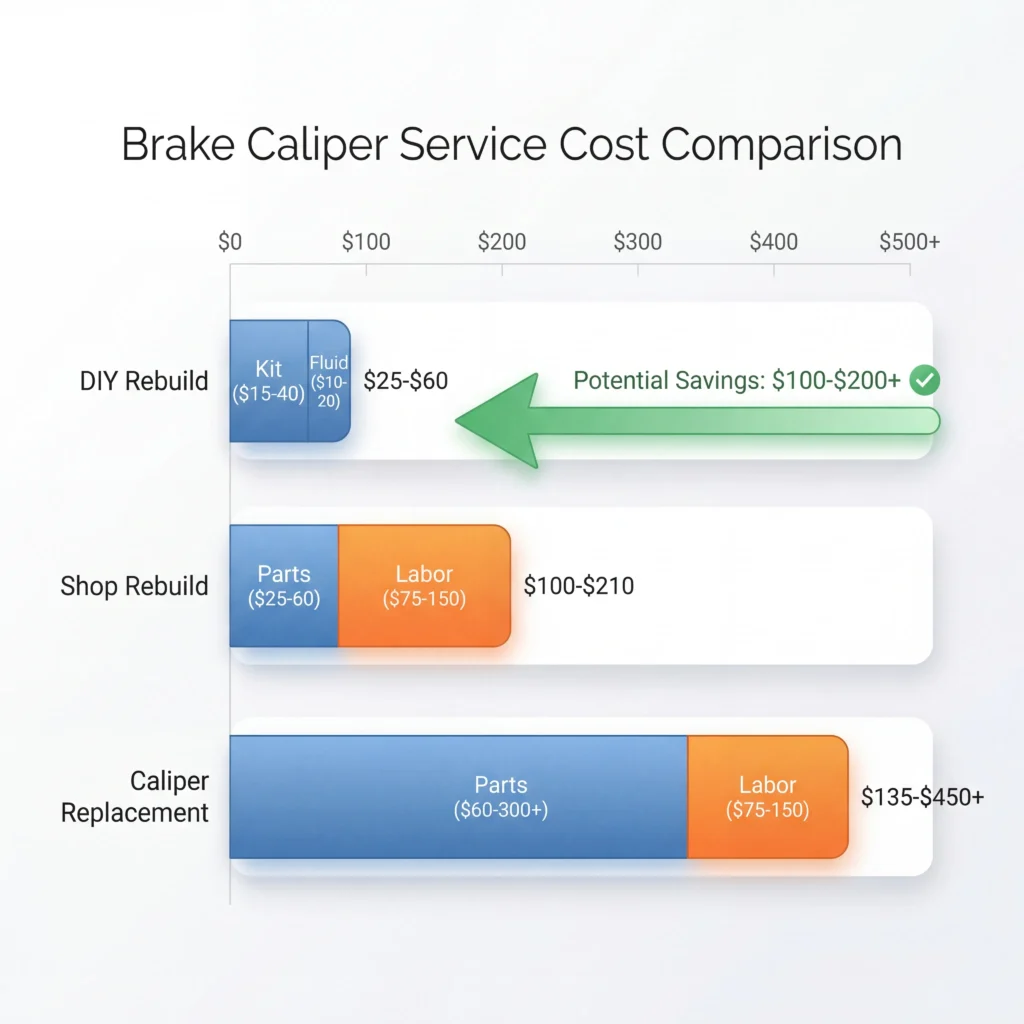
DIY Rebuild Costs
A rebuild kit runs $15 to $40. Brake fluid adds $10 to $20. Factor in your afternoon: 1 to 2 hours per side, more if you’re learning. Total parts cost: $25 to $60 per caliper.
Shop Rebuild Costs
Parts run $25 to $60. Labor adds $75 to $150 per caliper depending on your region. Shops in the Pacific Northwest tend toward the higher end. Rural Midwest shops often charge less. Total: $100 to $210 per caliper.
Caliper Replacement Costs (For Comparison)
A remanufactured caliper costs $60 to $100. A new OEM caliper can run $100 to $300 or more depending on the vehicle. Porsche and BMW calipers hit the upper range. Honda and Toyota stay lower. Labor adds $75 to $150. Total: $135 to $450+ per caliper.
The Real Savings
For most vehicles, a DIY rebuild saves $100 to $200 per caliper compared to shop replacement. That’s $200 to $400 for a front axle job. The trade-off is your time: budget a full morning or afternoon for a first-time rebuild.
When Rebuilding Doesn’t Pencil Out
Where rebuilding doesn’t make sense: when remanufactured calipers for your vehicle cost less than $50 and include a core exchange. At that price point, the time investment of rebuilding isn’t justified unless you specifically want to learn the process. Common vehicles like the Honda Accord, Toyota Camry, and Ford Focus often fall into this category.
FAQ
Is it worth rebuilding a brake caliper?
For calipers with clean bores and no structural damage, rebuilding saves real money. Parts cost $15 to $40 versus $60 to $150+ for replacement. If the bore is scored or the housing is cracked, replacement is the only option. Run the 3-question assessment before ordering parts.
How hard is it to rebuild a brake caliper?
The process is straightforward for someone comfortable with basic brake work. The critical skills are inspecting the bore accurately, handling seals without damaging them, and bleeding the system properly afterward. First-timers should budget 1 to 2 hours per caliper. If you’ve never done any brake work, this isn’t the place to start. Get comfortable with pad replacement first.
Are caliper repair kits worth it?
Quality kits from known brands like Raybestos, Dorman, and Carlson are worth the investment. Cheap kits use rubber compounds that harden faster and fail sooner. The price difference is typically $10 to $15 for significantly better durability and seal life.
What’s included in a brake caliper rebuild kit with piston?
Full kits include a new piston (phenolic or steel), piston seal (square-cut seal), dust boot, bleeder cap, and sometimes guide pin boots and copper washers. The piston is the most expensive component, which is why basic kits omit it.
How long does a caliper rebuild last?
A properly done rebuild with quality parts lasts 5 to 7 years or 75,000 to 100,000 miles under normal driving conditions. Harsh winters with road salt can cut this by 30 to 40%. Extreme heat climates like Arizona see slightly faster seal degradation. EV and hybrid owners should add 1 to 2 years if they regularly exercise their brakes.
Can I rebuild just one caliper?
You can, but rebuilding both sides of the same axle is recommended. Calipers wear at similar rates, and mismatched caliper condition can cause uneven braking. If you’re rebuilding one because it failed, the other likely isn’t far behind.
What grease should I use when rebuilding calipers?
Silicone-based brake grease only. Never use petroleum-based products on rubber brake components. Products like Permatex Brake Lube or Sil-Glyde work well. For the seals and piston during assembly, clean brake fluid works as a lubricant.
Do I need to bleed the brakes after a caliper rebuild?
Yes. Any time you open the hydraulic system, air enters. Bleeding removes this air. A soft or spongy pedal after reassembly means air is still present. Bleed until you get solid fluid with no bubbles at all four corners.
Why is my caliper still sticking after a rebuild?
If you’ve done the rebuild correctly and the caliper still sticks, check the brake hose. Collapsed hoses act as one-way valves, letting fluid push the piston out but not retract. Also check the slide pins. Bent or dry pins cause the caliper to bind on the bracket regardless of piston condition.
The Bottom Line on Caliper Rebuilds
A brake caliper rebuild kit gives you a $15 to $40 solution for a caliper that would otherwise cost $60 to $150+ to replace. The process requires attention to detail, proper tools, and honest assessment of bore condition.
Know the spec, follow the procedure, and don’t skip steps. A rebuilt caliper done right performs identically to new. A rebuild done poorly fails, sometimes catastrophically.
Ready to start? Gather your kit, clear your afternoon, and set aside a clean workspace. Take your time on the bore inspection. That’s the step that determines success.
For more on the complete brake system, including calipers, drums, and parking brakes, see the Brake Drums guide.
— Garrett Stowe
