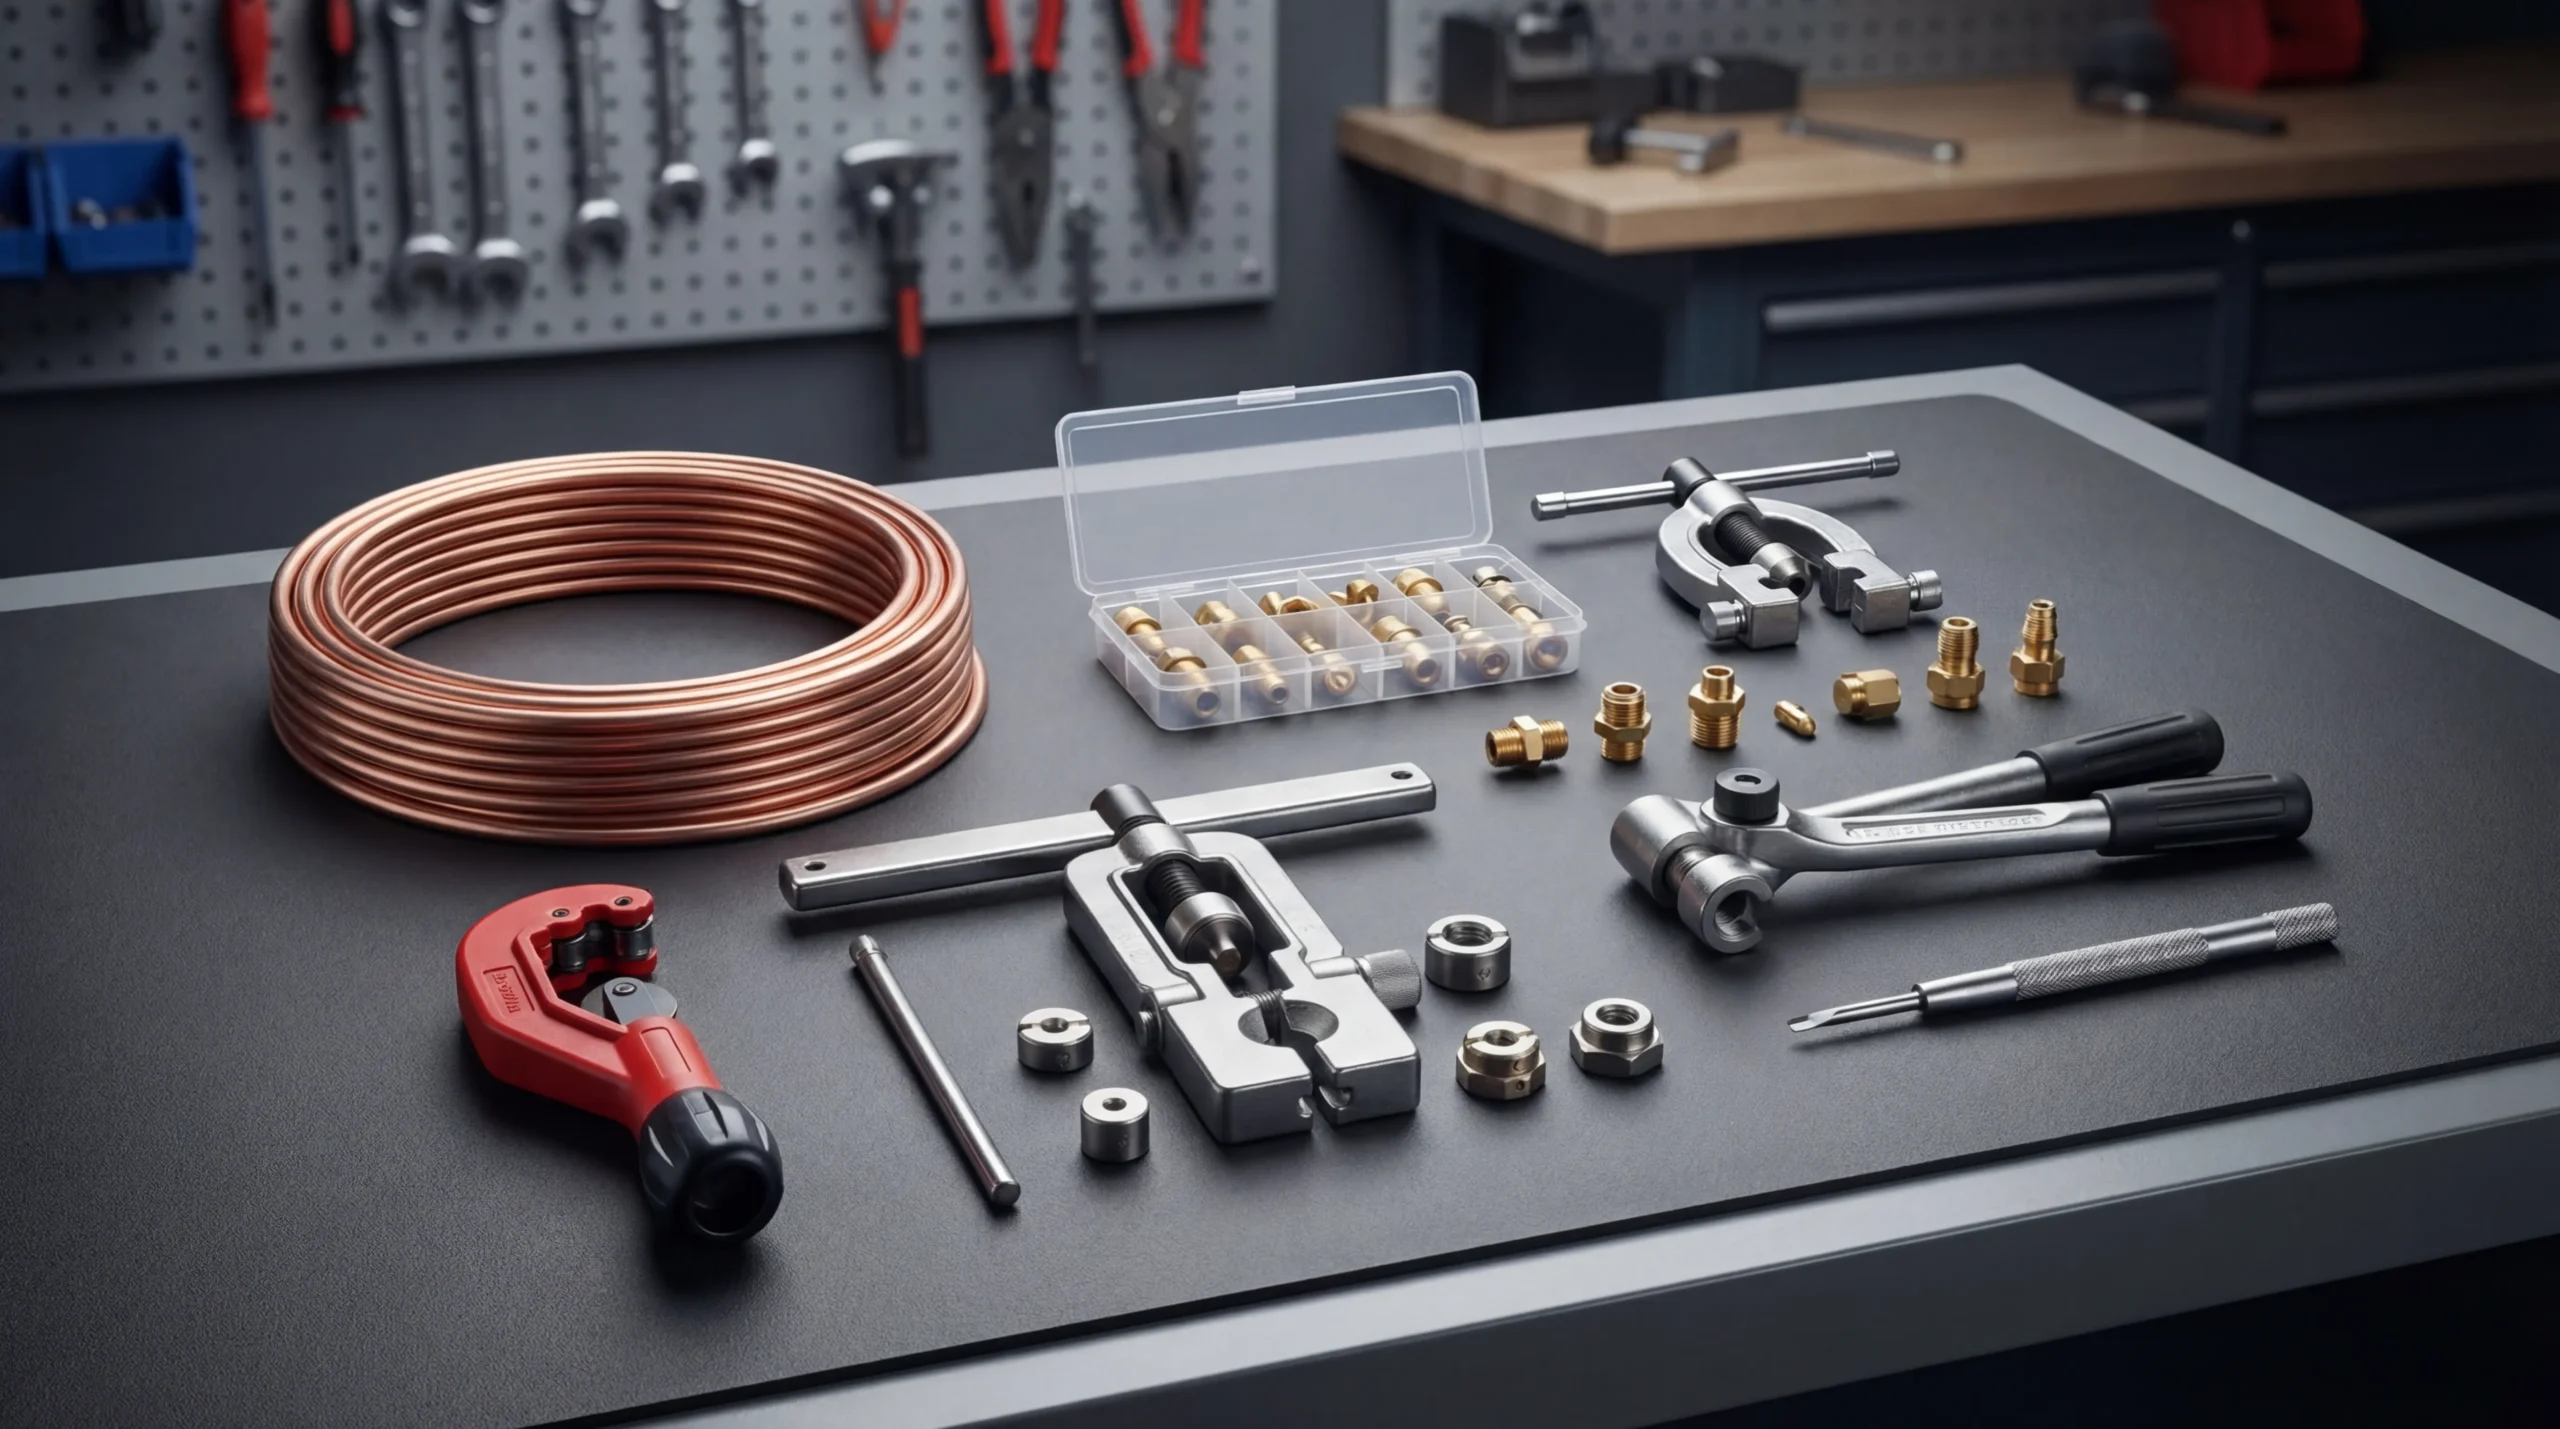

A standard brake line repair kit contains five to eight core components, and knowing what each piece does determines whether your repair holds pressure or leaks at the first hard stop. The typical kit includes brake tubing (usually 3/16-inch diameter), a tubing cutter, a flaring tool with dies, assorted fittings and flare nuts, and often a tube bender. Some kits add union connectors for splicing sections together. The tubing material varies: steel, copper-nickel, or stainless. Each handles corrosion and flaring differently, and the wrong choice for your climate or skill level creates problems down the line.
This matters because brake lines operate under extreme hydraulic pressure, sometimes exceeding 1,000 PSI during hard braking. A poorly formed flare or mismatched fitting doesn’t just leak fluid; it introduces air into the system, and air compresses where fluid doesn’t. The result is a spongy pedal and longer stopping distances. I’ve documented repairs across several vehicles over the years, and the difference between a proper flare and a rushed one shows up fast under real braking conditions.
If you’re maintaining your vehicle’s brake system on a schedule, this guide connects to the broader question of how often to change brake fluid, since line work and fluid service often happen together. Below, I’ll break down what comes in these kits, explain the flare types you’ll encounter, compare tubing materials, walk through the replacement procedure, and help you decide whether this is a job for your garage or a shop.
Safety Notice: Brake systems are safety-critical. This guide shares procedures based on personal experience, but your vehicle, tools, and skill level may differ. Wear appropriate PPE including safety glasses and nitrile gloves (brake fluid damages skin and eyes). Work in a ventilated area when using brake cleaner or penetrating oil. Keep brake fluid away from hot surfaces like exhaust manifolds; it’s combustible. If you’re uncertain at any step, consult a qualified mechanic. The author and BrakeTireGuide assume no liability for work performed based on this information. Prices mentioned were accurate at time of publication (March 2026) but may have changed.
What Comes in a Brake Line Repair Kit
The core of any brake line repair kit is the tubing itself. Most kits ship with 25 feet of 3/16-inch tubing, which covers the majority of passenger vehicle brake lines. Some include 1/4-inch tubing for older domestic trucks or specific import applications. The tubing comes coiled, and you’ll cut it to length as needed.
Pro Tip from Rohan: Before buying a kit, check if it includes dies for both 3/16-inch and 1/4-inch tubing. Most passenger vehicles use 3/16-inch, but having both sizes means you won’t need a second kit if you work on an older truck or encounter a non-standard line.
The flaring tool is the second critical component. This clamps the tubing and forms the flared end that seats against the fitting. Quality varies significantly here: entry-level kits use a simple bar-type flaring tool, while mid-range options include a more robust mechanism that produces more consistent flares. The tool comes with dies sized to match common tubing diameters. Worth noting: the die must match your tubing exactly, or the flare will be off-center and prone to leaking.
Fittings and flare nuts round out the hardware. A typical assortment includes standard SAE fittings (common on American vehicles) and metric fittings (European and Asian applications). Union connectors allow you to splice two line sections together, though I’d recommend replacing a full section rather than splicing whenever the routing allows. Compression fittings sometimes appear in cheaper kits, but these should never be used on brake lines. They cannot handle the pressure and are known to leak under stress.
The tubing cutter produces clean, square cuts that flare properly. A hacksaw technically works, but it leaves burrs and rarely cuts perpendicular to the tube. The dedicated cutter pays for itself in reduced frustration. Most kits include a deburring tool or the cutter has a built-in blade for cleaning the cut edge.
Optional components vary by kit: a tube bender for routing lines around obstacles, extra fittings in common sizes, or a case for organized storage. The bender matters more than people assume; kinked tubing restricts flow and creates weak points.
Kit contents checklist:
- Brake tubing (25 ft typical, 3/16-inch standard)
- Flaring tool with dies
- Tubing cutter
- Deburring tool or blade
- Assorted fittings (SAE and metric)
- Flare nuts (various sizes)
- Union connectors
- Tube bender (in better kits)
What most kits don’t include but you’ll need: A flare nut wrench (standard wrenches round fittings), fresh brake fluid, a catch pan for spills, brake cleaner, and penetrating oil for frozen fittings.
Related: Understanding brake line fittings in detail helps you match the right hardware to your vehicle.
Types of Brake Line Flares: Double, Bubble, and ISO
The flare at the end of a brake line creates the seal. Get the type wrong, and the line won’t seat properly in the fitting, regardless of how tight you crank the nut. There are three main flare types, and vehicle origin largely determines which one you need.
The distinction matters because these flares are not interchangeable. A double flare won’t seal in a bubble flare fitting; the geometry doesn’t match, and you’ll chase leaks until you start over with the correct type. I’ve seen people waste an entire afternoon trying to force the wrong flare to work. Check your existing lines before you cut anything.
Double Flare (SAE/Inverted)
Double flares fold the tubing end back on itself, creating a two-layer thickness at the sealing surface. This design handles high pressure well and resists cracking better than single-layer alternatives. American manufacturers (Ford, GM, Chrysler) have used double flares as standard since the 1960s. The 45-degree angle seats into a matching concave surface in the fitting.
Creating a double flare requires two steps: first forming a bubble, then folding it inward. The process takes longer than a bubble flare but produces a stronger seal. If your vehicle came from a domestic manufacturer, this is almost certainly what you need.
Bubble Flare (DIN/ISO)
Bubble flares form a rounded, convex end rather than a folded one. European and Asian manufacturers (BMW, Mercedes-Benz, Volkswagen, Toyota, Honda) typically use this style. The bubble shape seats into a matching concave fitting, and the single-step forming process makes these slightly easier to create with the right tool.
Bubble flares handle adequate pressure for brake systems but can’t match the double flare’s resistance to cracking under extreme stress. If you’re replacing lines on an import, check your existing flares before buying a kit; some kits only include double-flare dies.
ISO/Metric Flare
ISO flares follow international dimensional standards and appear on most modern European vehicles. They’re functionally similar to bubble flares but with specific measurement requirements. When shopping for fittings, “ISO” and “metric” often appear together; verify the thread pitch matches your vehicle’s components.

| Flare Type | Common Vehicles | Pressure Handling | Forming Steps | Tool Compatibility |
|---|---|---|---|---|
| Double (SAE) | US domestic (Ford, GM, Chrysler) | High | Two-step | Most kits include |
| Bubble (DIN) | European, Asian imports | Moderate | One-step | Check kit contents |
| ISO/Metric | Modern European | Moderate | One-step | Verify die sizes |
Before you cut any tubing, examine the existing flare on your vehicle. Compare it visually to reference images, or remove a fitting and inspect the seat. The thirty seconds spent confirming flare type saves hours of rework.
Choosing the Right Tubing Material
Brake line tubing comes in three primary materials, and your choice affects corrosion resistance, ease of flaring, and long-term durability. The material question matters more if you drive in regions with road salt or high humidity.
Steel (OEM Standard)
Plain steel tubing is what most vehicles leave the factory with, usually coated with a thin layer of zinc or another corrosion inhibitor. It’s rigid, holds shape well under pressure, and costs less than alternatives. The downside: steel corrodes, especially in salt-belt states. After several winters, factory steel lines can develop pinhole leaks or rust through at mounting points where moisture collects.
Steel flares cleanly with proper technique but requires more force than softer materials. The rigidity also makes bending trickier; kink a steel line and you’ve wasted that section.
Copper-Nickel (Cunifer/NiCopp)
Copper-nickel alloy (typically 90% copper, 10% nickel) has become the aftermarket standard for good reason. It resists corrosion far better than steel, bends more easily by hand, and flares with less effort. Testing documented by the Copper Development Association showed copper-nickel outperforming steel significantly in salt-spray burst tests after equivalent service time.
The material is DOT-approved and meets pressure requirements for brake systems. It’s softer than steel, which means you need to handle it carefully during installation to avoid kinks. I’ve used copper-nickel on several brake line replacements, and the flaring process is noticeably more forgiving than steel. For first-timers, that forgiveness is worth the slightly higher cost.
Stainless Steel
Stainless offers the best corrosion resistance and the highest strength, but it’s the most difficult to work with. Flaring stainless requires more force and better technique; the margin for error shrinks. It’s also the most expensive option.
For most DIY applications, stainless is overkill. It makes sense for show vehicles, marine applications, or situations where the lines will see extreme environmental exposure. If you’re doing your first brake line job, start with copper-nickel.
| Material | Corrosion Resistance | Ease of Flaring | Ease of Bending | Cost (2026) | Best For |
|---|---|---|---|---|---|
| Steel | Low-moderate | Moderate | Difficult (kink risk) | Low | Budget repairs, mild climates |
| Copper-Nickel | High | Easy | Easy (by hand) | Medium | Salt-belt states, DIY work |
| Stainless | Highest | Difficult | Moderate | High | Marine, show cars, extreme exposure |

If your kit came with steel tubing but you’re in a corrosive environment, consider purchasing copper-nickel coils separately. The tubing upgrade costs roughly $20-40 for a 25-foot coil (2026 pricing), and it’s a worthwhile investment for longevity.
How to Replace a Brake Line Step by Step
The procedure itself isn’t complicated, but the details matter. Rushing leads to leaks, and leaks in a brake system aren’t minor inconveniences. Set aside three to four hours for your first line replacement; the process speeds up with experience.
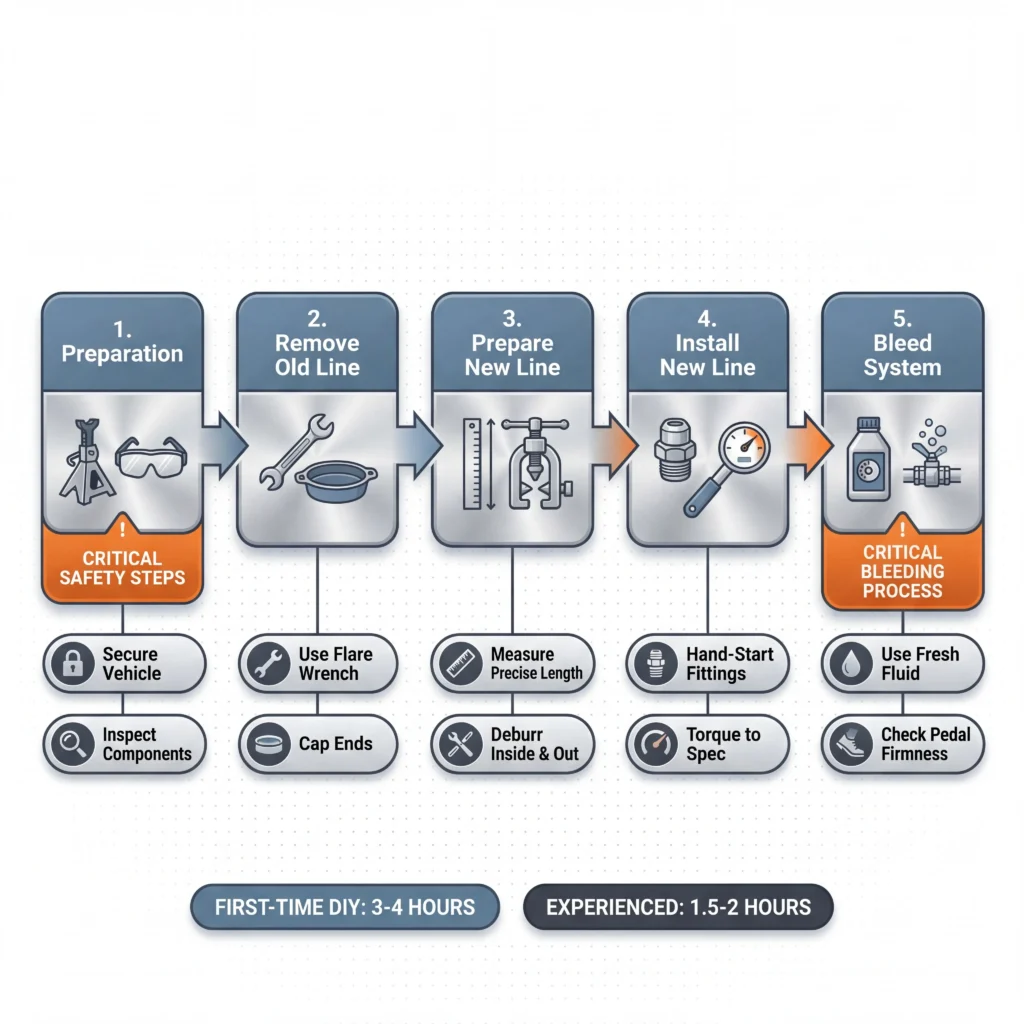
Preparation
Gather your safety equipment first: safety glasses rated for impact, nitrile gloves (brake fluid will damage your skin with prolonged contact), and work clothes you don’t mind staining. Brake fluid strips paint and finishes, so keep rags handy.
Secure the vehicle on jack stands at all four corners if you’re replacing a full line. Wheel chocks and the parking brake engaged. Work in a ventilated area, especially when using penetrating oil or brake cleaner; the fumes aren’t something you want to breathe in an enclosed garage. Put a drain pan under the work area.
Locate both ends of the line you’re replacing: one end connects to the master cylinder or a junction block; the other connects to the brake caliper, wheel cylinder, or a flexible hose. Spray penetrating oil on all fittings and let it soak while you prepare the new line.
Pro Tip from Rohan: Slide the flare nuts onto the tube before flaring. This step is easy to forget when you’re focused on making a clean cut. If you flare first and then realize the nut isn’t on, you’ll have to cut off the flare and start that section over.
Remove the Old Line
Using a flare nut wrench (not a standard open-end wrench, which rounds fittings), loosen the connection at the caliper or wheel cylinder end first. Garrett covers the importance of proper brake line wrenches in his tool guide; the six-point grip prevents the damage that standard wrenches cause on corroded fittings.
Loosen but don’t fully remove yet. Move to the other end and do the same. Once both ends are loose, remove any clips or brackets holding the line to the frame. Pull the old line out, following its routing carefully. You’ll replicate this path with the new line.
Prepare the New Line
Measure the old line’s length using string that follows every bend. Add a quarter inch for each flare (the forming process uses material). Cut the new tubing with your cutter, ensuring a square, perpendicular cut. Rotate the cutter around the tube rather than forcing it; clean cuts flare better.
Deburr inside and outside edges. Slide the flare nuts onto the tube before flaring, threading them from the correct direction.
Clamp the tubing in the flaring tool, leaving the correct amount protruding above the die (your tool’s instructions specify this; it varies by tool). Form the flare. For double flares, complete both stages. Inspect the result: it should be smooth, concentric, and crack-free. Any imperfection means starting over. This is where patience pays off.
Using the old line as a template, bend the new tubing to match. Work slowly. Overbending copper-nickel weakens it; overbending steel risks kinking. A tube bender helps with tight radius bends.
Install the New Line
Route the new line into position, securing it with clips as you go. Hand-thread the fittings to ensure proper alignment; cross-threading destroys fittings and creates leaks. Once hand-tight, use the flare nut wrench to snug them. The flare creates the seal, not excessive torque. Overtightening cracks flares or strips threads. A quarter to half turn past hand-tight is typically sufficient, though your vehicle’s service manual may specify exact torque values.
Bleed the System
Air entered the system when you opened it. Before driving, bleed the brakes to remove it. Start at the wheel furthest from the master cylinder and work toward the closest. Open the bleeder valve, have an assistant press the brake pedal, close the valve while they hold the pedal down, release. Repeat until fluid runs clean with no bubbles.
If your vehicle has ABS, the bleeding procedure may require a scan tool to cycle the ABS modulator. Standard bleeding doesn’t always purge air trapped in the hydraulic control unit. See the guide on bleeding brakes on ABS systems for the full procedure.
Top off the brake fluid reservoir with fresh fluid from a sealed container. Press the brake pedal several times to confirm firmness. Test at low speed in a safe area before normal driving.
When to DIY vs When to Call a Mechanic
Not every brake line repair belongs in a home garage. The decision depends on your tools, experience, and the specific repair required.
DIY makes sense when:
You’re replacing a single accessible line with a clear routing path. The fittings aren’t severely corroded (penetrating oil loosens them without rounding). You own or can borrow a quality flaring tool; the cheap ones produce inconsistent results. You’re comfortable bleeding brakes and have an assistant or a one-person bleeder kit. The repair is on a secondary vehicle, giving you time to work without deadline pressure.
A basic brake line repair kit costs $30-80 depending on quality (2026 pricing). Tubing coils run $15-40 for 25 feet. Compare that to shop labor, typically $100-200 per hour for brake work, and the DIY savings are substantial if you have the time and tools.
Call a mechanic when:
The repair involves the ABS modulator or lines within the hydraulic control unit. Multiple lines need replacement simultaneously, especially if they’ve corroded to the point of crumbling when touched. You don’t have access to a quality flaring tool (rental programs exist at some auto parts stores like AutoZone, O’Reilly, or NAPA). The routing is complex, running through tight spaces where bending errors are likely. You’re uncomfortable with the bleeding process or don’t have someone to assist.
| Factor | DIY | Professional Shop |
|---|---|---|
| Kit/Parts Cost (2026) | $30-80 + $15-40 tubing | Included in labor |
| Labor Cost | Your time (3-4 hours first job) | $150-300+ depending on location |
| Tools Required | Flaring tool, wrenches, bleeder kit | Provided |
| Best For | Single accessible line, learning experience | Multiple lines, ABS work, time constraints |
In practice, I’d recommend starting with a single line on a non-critical vehicle if you’ve never done this before. The learning curve exists, and practicing on a daily driver with a deadline creates pressure that leads to mistakes. Once you’ve successfully completed one repair and confirmed no leaks under pressure, you’ll know whether this is work you want to continue doing yourself.
Common Flaring Mistakes and How to Avoid Them
Even with the right tools, a few common errors can turn a straightforward job into a frustrating afternoon. Most of these come down to rushing or skipping preparation steps.
Angled cuts happen when you force the tubing cutter instead of letting it rotate around the tube. An angled cut produces an uneven flare that won’t seat properly. The fix: multiple light passes with the cutter, rotating fully around the tube each time.
Forgetting to deburr leaves metal shavings inside the line. These end up in your brake fluid and eventually clog components. The fix: always deburr both the inside and outside edges after cutting, and blow through the line or run a clean rag through it.
Wrong flare height in the tool produces flares that are either too shallow (won’t seal) or too thick (won’t fit in the fitting). The fix: follow your specific tool’s instructions for how much tubing should protrude above the die. It varies by manufacturer.
Mismatched flare type wastes time and tubing. A double flare in a bubble flare fitting will never seal properly. The fix: inspect your existing flares before buying a kit, and verify your tool can produce the type you need.
Skipping the flare nut before flaring means cutting off your work and starting over. The fix: make it a habit. Cut, deburr, slide nut on, then flare. Every time.
FAQ
Can I fix a brake line myself?
You can, provided you have the right tools and approach the job methodically. A brake line repair kit gives you the tubing, flaring tool, and fittings needed for the job. The critical skill is creating a proper flare; a bad flare leaks, and leaks in brake systems compromise stopping ability. If you’ve never flared tubing before, practice on scrap pieces until your flares come out clean and concentric. The replacement procedure takes three to four hours for a first-timer, less with experience.
Can you splice a broken brake line?
Union connectors technically allow splicing two line sections together. In practice, I’d avoid splices when full replacement is possible. Each connection point is a potential leak location, and splices add two such points. If the routing makes full replacement impractical (the line runs through a sealed section you can’t access), a union splice can work as a repair. Use DOT-approved fittings, never compression fittings.
How to temporarily stop a brake line leak?
There’s no safe temporary fix for a leaking brake line. The system operates under high hydraulic pressure; patches, tape, and sealants will fail. If you discover a leak, the vehicle shouldn’t be driven until the line is properly repaired or replaced. Driving with a leaking brake line risks total brake failure. If you’re stranded, call for a tow rather than attempting a roadside patch.
Which brakes go out first?
Front brakes typically wear faster than rears because weight transfers forward during braking, putting more load on the front system. For brake lines specifically, corrosion patterns depend on exposure: lines routed near the exhaust see more heat cycling, lines along the frame’s underside collect road spray and salt. Rear lines often corrode first in salt-belt states because they run the length of the vehicle’s undercarriage. Inspect all lines during routine maintenance regardless of which you expect to fail first.
How much is a brake line repair kit?
Basic kits with tubing, a simple flaring tool, and assorted fittings start around $30-50 (2026 pricing). Mid-range kits with better flaring tools and more comprehensive fitting assortments run $60-100. If you purchase a quality flaring tool separately (recommended for consistent results), expect $40-80 for the tool alone, plus $15-40 for tubing coils and $10-20 for fitting assortments. Compare that to professional repair costs of $150-300 or more depending on line location and shop labor rates in your area.
Are compression fittings safe for brake lines?
No. Compression fittings cannot handle the hydraulic pressures present in brake systems and are known to leak under stress. Never use compression fittings on brake lines, regardless of what a kit might include or what shortcuts forums suggest. Proper flared connections with matching fittings are the only safe approach. The few minutes saved using compression fittings isn’t worth the brake failure risk they create.
The Bottom Line on Brake Line Kits
A brake line repair kit gives you the components to replace corroded or damaged lines yourself: tubing, flaring tool, cutter, and fittings. The procedure itself isn’t complicated, but the details matter.
Key takeaways:
- Match your flare type to your vehicle (US domestic = double flare; European/Asian = bubble flare)
- Choose tubing material based on your climate (copper-nickel for corrosion resistance in salt-belt states)
- Never use compression fittings on brake lines
- Bleed the system thoroughly after any line work
- When in doubt, consult a qualified mechanic
Start here: If you’re new to brake work, read the brake line fittings guide to understand the hardware before you buy a kit.
For related maintenance, the guides on brake line wrenches and bleeding brakes on ABS systems cover the tools and post-repair procedures in more depth.
All of this connects to the broader topic of brake fluid maintenance. The complete guide to how often to change brake fluid covers fluid intervals, contamination signs, and the flush procedure that often accompanies line work.
The procedure itself isn’t complicated, but the details matter.
— Rohan Pettis
